Creating an Automation
Creating Automation on Fyno helps you move the "logical reasoning" that you would need to apply at your application code level to a visual setting.
It gives you the freedom to tweak any aspect of an entire Automation, without having to worry about breaking any of the current flows, safely test the scenario as a whole and then move it into production.
Create an Automation
You can easily navigate to the Automation section by clicking on the same from the left navigation panel at any time.
On the landing page of Automation, you can see the list of all the automations you have created, along with a few options.
To the left, you will find an easy toggle to change your view between a card grid and a list view, for your convenience.
Your option to filter out only the Live routes as well as the Channel filter is on the top of the page. Read more about Versioning now
Create +: Allows you to create a new Automation flow. A new pop-up window appears where you will need to fill in a name for the Automation along with a description.
When you click on Create+ and fill in the name details, a new page will open up, where all the magic of Automations happens.
Let's have a look at the components involved in creating and invoking automation:
- Click on the "Create+" button. A pop-up will appear for you to enter the name and description details and Submit.
- Once submitted, you will be prompted to:
Select an Input Source: You can select one of the options from the drop-down.- Webhook: Create the automation using a Webhook as the trigger.
- Virtual Mobile Number: A virtual mobile number with the capability to receive incoming messages can be configured here as well. Contact [email protected] for configuring a virtual number.
- Mixpanel: Cohorts created in Mixpanel can be synced to Fyno and used as a trigger.
Configuring Webhook
URL for this Automation: This is the URL that is created for this Automation only when you select Webhook as your source of input. The URL is auto-generated when you create the automation. You will need to use this URL to invoke this Automation.
We provide URLs for both Test and Live. Please copy both the URLs and configure it in your system or any third party tool where the webhook will be triggered.
Public:
If you are using Public URL, you can select one of these 2 options.
- Token Auth - the URL includes a query parameter
token=<Fyno_generated_token>. - Basic Auth - the URL consists of the combination of your workspace ID and the token which Fyno uses for authentication.
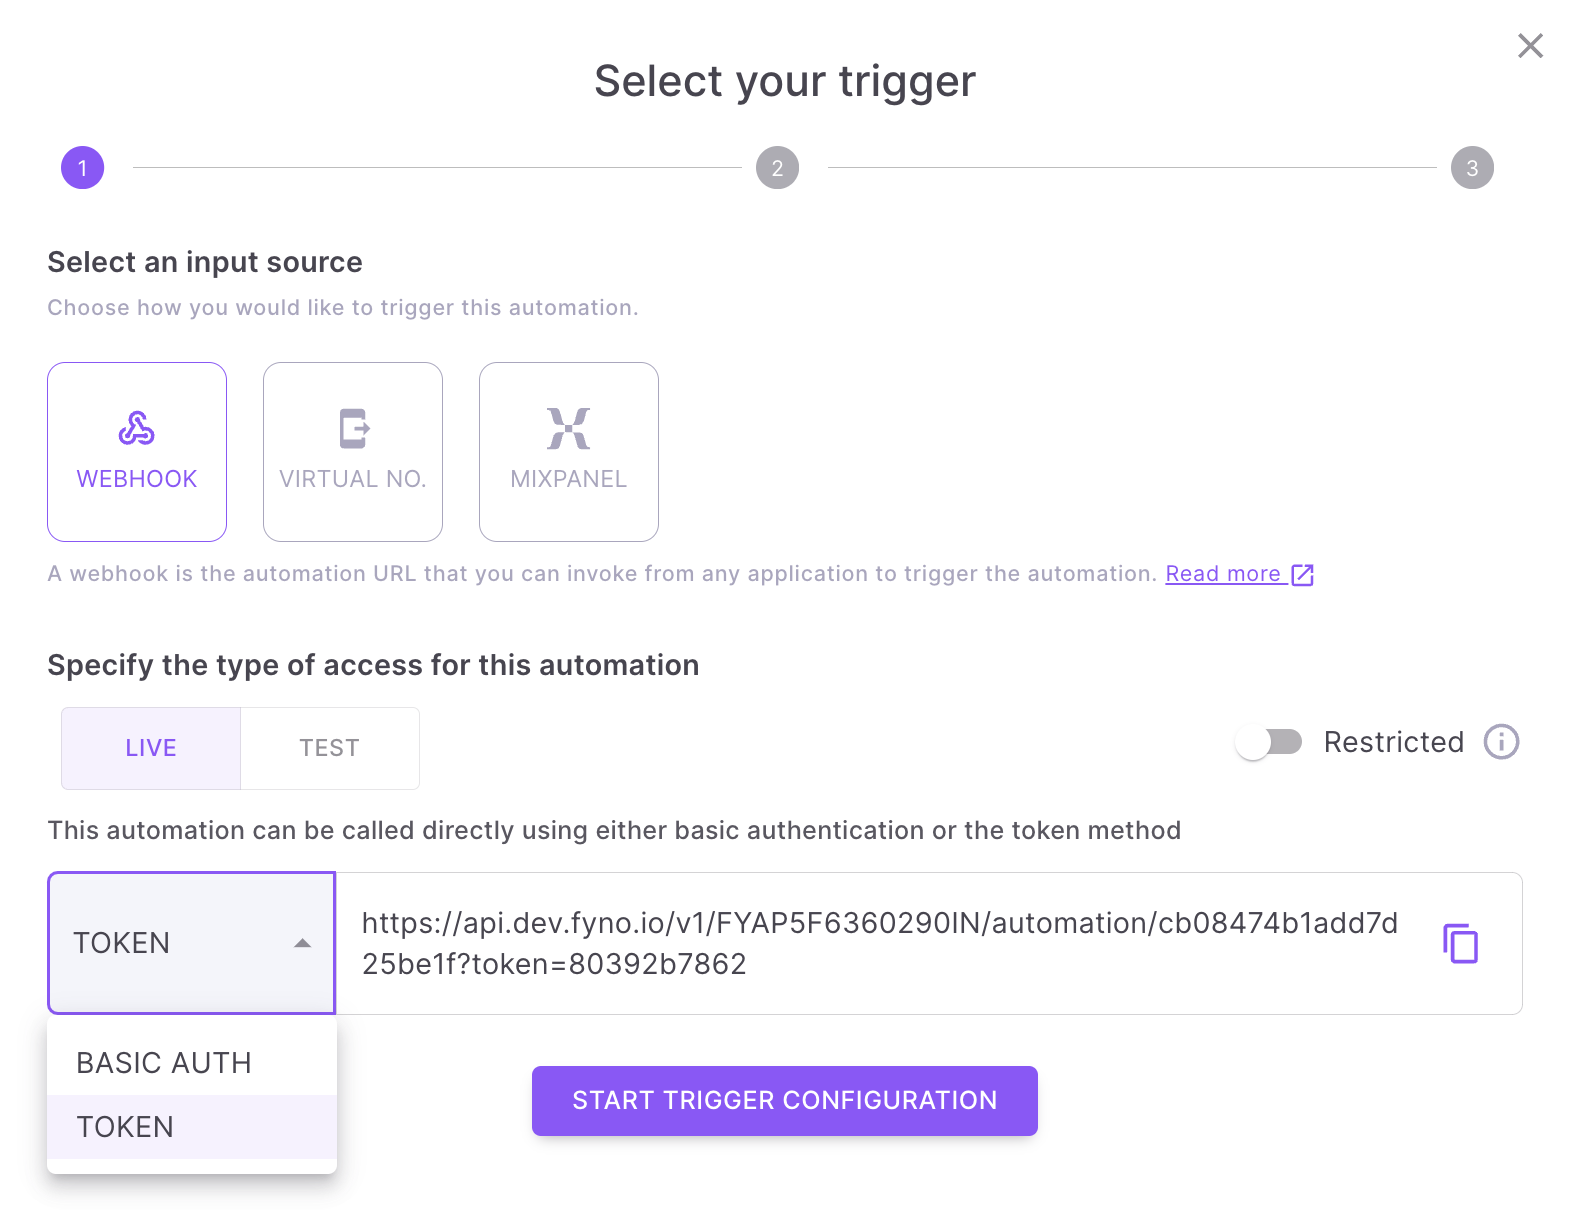
By default, automations are public. If you enable the "Restricted" option while creating an automation and save it with this setting, you must use "restricted" URLs (Live & Test) when executing the automation.
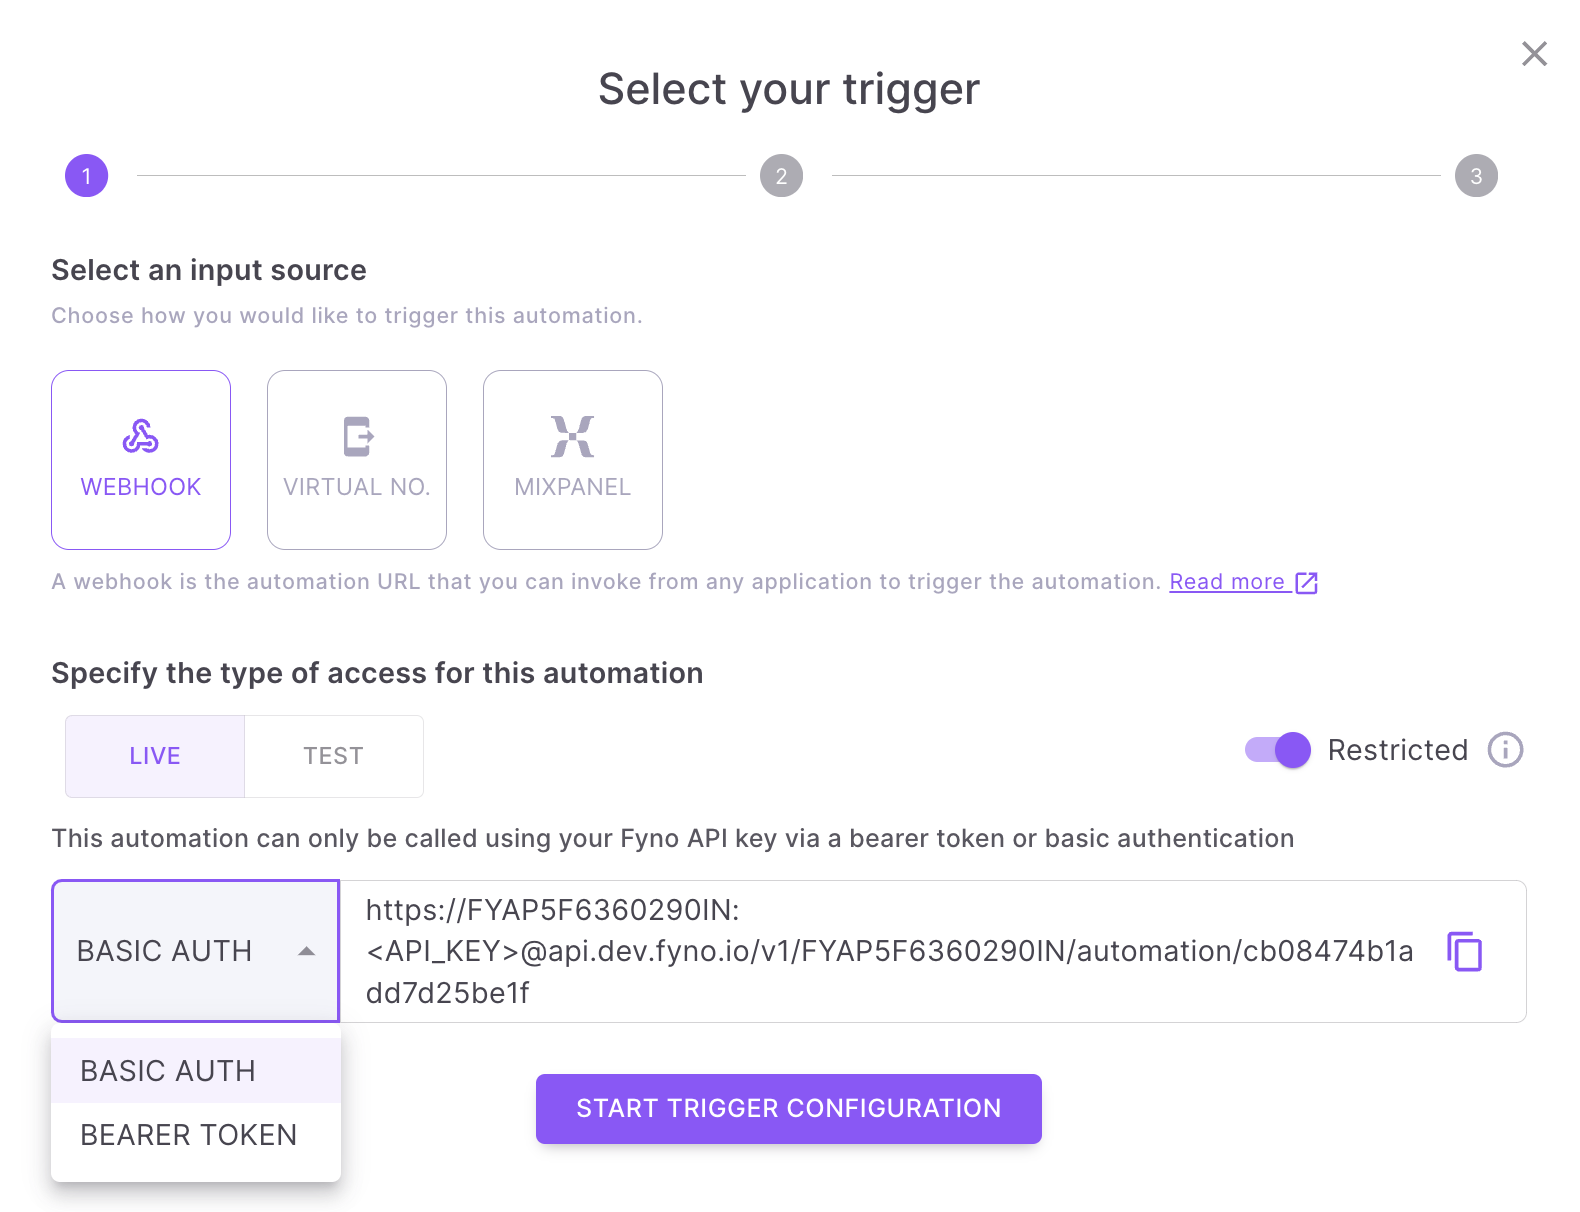
Restricted:
If you want to use Restricted access, enable the Restricted Toggle as shown below. You can select one of these 2 options.
- Bearer Token - Pass your Fyno API Key as a bearer token in the authorization header. {'Authorization': 'Bearer <YOUR_FYNO_API_KEY>'}.
- Basic Auth - the URL consists of the combination of your workspace ID and API Key which Fyno uses for authentication.
Example - https://<WORKSPACE_ID>:<API_KEY>@api.dev.fyno.io/v1/automation/e66188177195eca857a1
To switch an automation to "Public" later, use the "Copy URL" dialog (accessible from the ellipsis at the top right). Don't forget to update the URL when running the automation after this modification.
- Once filled, click on "Start Trigger Configuration" to take you to the next step.

- The Webhook is the URL generated by the automation at the time of creation.
In a traditional scenario, while calling an endpoint either from an application or a tool like Postman, you provide one or more of the following options -
- An HTTP method -
GET,POSTetc. - A payload.
- Query parameters.
- An HTTP header like the
Content-Type.

You can update the token using the "Customize Token" option in the automation details page header.
Since you can invoke the automation URL from anywhere, it is a good idea to update the token if you feel it has been compromised. You must always remember to update the automation URL (with the new token) at the source from where the automation is called.
What is a Trigger?
A trigger is a piece of information which acts as a causative action, that will set into motion the actions desired from the trigger. This is the starting point.
Similar details should be passed to the Webhook/Automation URL when invoking the automation.
What is Payload mapper and how does it work?
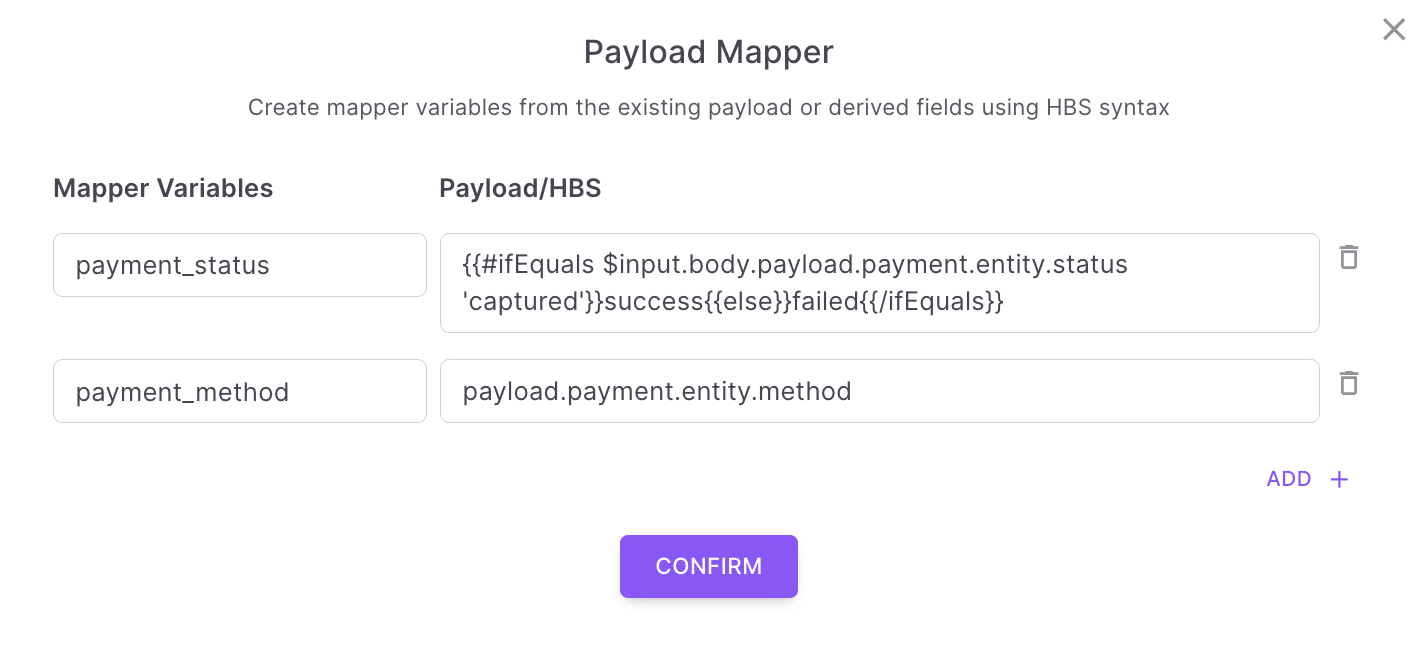
Using complex payloads for placeholder mapping can be challenging. Additionally, employing a payload variable repeatedly for conditional checks in automation is a cumbersome task. To streamline this process, we've introduced the Payload Mapper. This feature allows you to create variables, map payload fields to these variables, and seamlessly use these new variables throughout the automation flow.
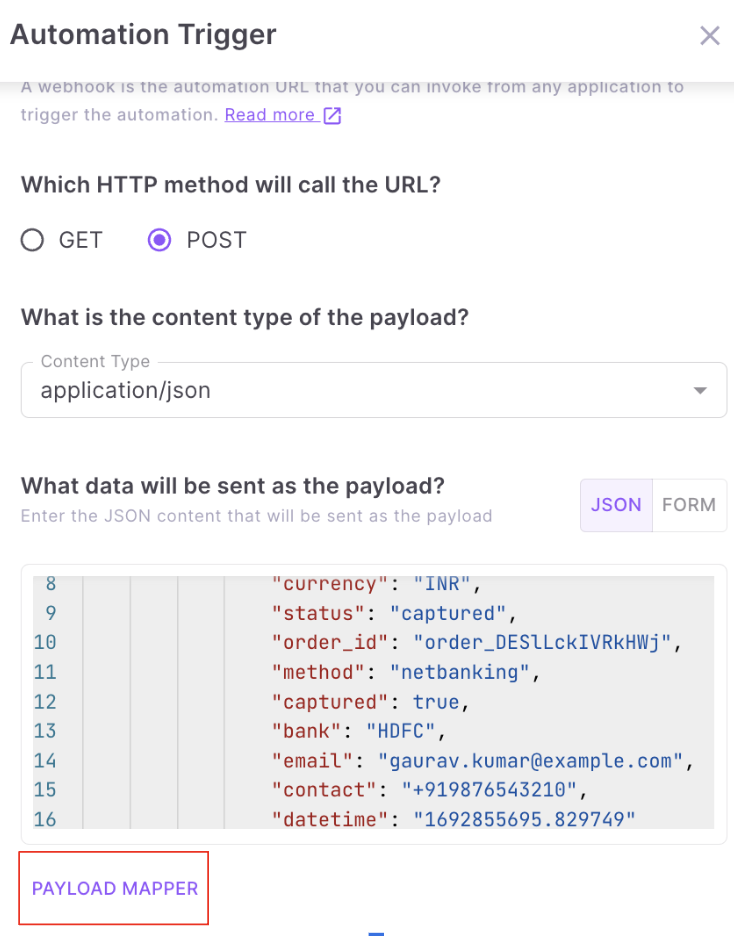
To configure the payload mapper, navigate to the "Webhooks" section. Within the form, positioned beneath the sample payload, you'll find the option to click on 'Payload Mapper'.
Example
{
  "payload": {
    "payment": {
      "entity": {
        "id": "pay_DESlfW9H8K9uqM",
        "entity": "payment",
        "amount": 100,
        "currency": "INR",
        "status": "captured",
        "order_id": "order_DESlLckIVRkHWj",
        "method": "netbanking",
        "captured": true,
        "bank": "HDFC",
        "email": "[email protected]",
        "contact": "+919876543210",
        "datetime":"1692855695.829749"
      }
    }
  }
}
- When directly mapping payload data, you can achieve it by linking, for example, 'payload.payment.entity.method' to the variable payment_method.
- However, if you're utilising Handlebars (HBS), the correct syntax involves using the payload data as '$input.body.payload.payment.entity.status' to map it to a variable like payment_status. Attempting to use just 'payload.payment.entity.status' will result in an error. To know more about Handlebars, please refer our documentation
There is no restriction on the number of mapper variables created. All mapper variable names need to be unique.
Mapper variable name must not be any of the following: 'body,' 'headers,' 'formdata,' 'query,' or 'method.'
How does Automation Work?
Let's illustrate this with our payment gateway example used by the ABC company. When ABC creates the automation in Fyno, they will configure their payment gateway to call the webhook/automation URL anytime a payment is processed.
Let's assume that the response sent by the payment gateway for a successful payment is the below JSON.
{
	"payment_id": "P1",
	"order_id": "O121",
	"payment_status": "success",
	"customer_details": {
		"name": "John Doe",
		"email": "[email protected]"
	},
	"payment_details": {
		"method": "card",
		"card_number": "XXXXXXXXX1234"
	}
}
When a payment succeeds, the gateway will invoke the automation URL by including the above response as a payload.
The details that we configure in the trigger step should reflect the details used by the source calling the automation. So in our example, if the gateway is invoking the Webhook/automation URL as a POST request, this is how ABC will configure the trigger -
HTTP method - POST
Query string - empty (since the gateway does not add any query strings to the URL)
Headers - empty (assuming that the gateway does not pass any headers in its response)
Content type - application/json (since the payload is of type JSON)
Payload - payment success JSON payload from the gateway
It is critical to note that the data configured in the trigger step is just a sample and only provides a means to build the rest of the automation flow, as you will see later. In other words, if the payment gateway provider adds a new attribute to the response, the automation will run as expected, even with the old payload. However, if you need to use this new attribute in the automation, updating the trigger step with the new payload is essential.
Outcome
Automations, at the crux of it, work in a way that allows you to add situation-based actions and allows you to arrive at an outcome of your choice every time.
Once we save the initial component, the next step of the flow opens up. You have 2 options here:
- Action: Action allows you to take an action based on the payload.
- Condition: Condition applies a condition to the details that were shared in the payload and helps further refine your query with a series of conditions.
Once a Trigger has been successfully set up and saved, we see the next component, which allows you to choose from Action or Condition.
To understand each of these components, a deep dive into the same is needed, which will be covered in the next sections.
Action
An "Action" in this scenario, refers to the action that needs to be taken based on the Trigger or an outcome of a Condition (explained below) that has been set off to Fyno's application.
On clicking Action, the right-side panel opens up and you will be able to see the following options:
Tigger Notification Event
Trigger Notification Event refers to the events internally created within Fyno's application and can be called as an action for the payload that was added in the previous step of the workflow.
Simply put, this is the "effect" to the "cause" that sets into motion a series of events.
On selecting the Trigger Notification Event
- Tigger Notification Event: Select a relevant Notification Event from the ones created in the Notification Events, specific to this Trigger.
- Notification Event Mapping :On selecting the notification event, you will see the Notification Event Mapping details. Basically, for the notification event that you have selected, you will need to specify details from the payload that is being received from the Trigger.
- To: In this section you will see all the options for the Destination listed from the Notification Event that needs to be triggered. You will need to specify the fields from the payload fields, that correspond to the Destination. Select the section of the "Input" from the sample payload, and then "To from one of the body parameters as well. For example, in the To if one of the fields is WhatsApp, then you will need to select the parameter from the payload that corresponds to the customer's WhatsApp number, so that the notification can be executed to the same, via WhatsApp.
- Data: In this section, you will see all the fields that you have specified as Placeholders (variable parameters/dynamic values) in the Template that is associated with the Notification Event that was selected. In case you do not see this field, this means that there are no Placeholders in the Template.
- Additional Data: Additional data in the form of a payload can be specified here if required, in JSON format. This is an optional field. A typical use case for additional data is when you do not manually add placeholders during template creation. For instance, if your template contains the text
Hi {{namebut you do not explicitly specifynameas a placeholder during template creation. Nevertheless, Fyno still identifies the name as a placeholder since it appears in the {{ }} syntax. In this scenario, you can include the value of the name in the Additional Data'section. To do this, specify the name as the key and select a corresponding value from the dropdown.
To add a custom value forname, type innameas the key, selectCustom Valuefrom the 'Select Value' dropdown, and provide the value in the format{{$input.body.name}}(assumingnamewill be part of the JSON payload when the automation is invoked.
Inputlocation matters!Specify the location of the input by specifying the section that it would appear in, for example, the body, or Query Parameters, by selecting one of the options from the drop down.
Call an API
Fyno's automation enables you to call external API's and run the subsequent automation based on the response received from the API call. This feature makes automations extremely powerful and flexible to handle various use cases.
The first step to calling an external API in an automation is to allowlist the API endpoint. To do this -
- Navigate to the Allowlist URL page
- Add and verify the URL/endpoint
On clicking the Call an API component, you'll see the following:
- Allowlist URL Name: Select a URL from the allowlist
- Method: Specify the method of input. It may be
- GET
- POST
- PUT
- DELETE
- API Endpoint: Provide the API that you want to call here.
- Headers: Headers allows you to specify the parameters you have passed in the webhook. The accepted method of input is JSON. This is optional.
- Payload: Provide a sample of the payload that will be received via the above-mentioned webhook. You will also need to specify the content type of the payload which may be:
- Application/JSON
- multi-part/form-data
- x-www-form-URL-encoded
- You can also select "Send the input data from the trigger as the payload" to simply pass the payload that was received with the trigger itself, as is, to the next step.
You can pass values configured in the trigger when adding a payload or header. For instance, you can use this format to pass name in a JSON payload assuming that the attribute name appears in the payload that was provided during the trigger configuration.
{
	"name": {{$input.body.customer_details.name}}
}
Did you know?
The response of an API call can be used to configure notification events.
For instance, if your API call returns a key
http_response.data.emailto configure the email in the notification event.
Condition
The Condition feature within Automations allows you to write all the conditional-based logical triggering that you would need to address different situations within a single workflow.
Conditions can be written for the parameters within the payload that are received from the initial Trigger and will help orchestrate the flow based on these parameters.
Watch Out!
The first Condition post a trigger will only have "Variable" to run that Condition.
In consequent Conditions, you will be able to see HTTP response and HTTP Source Code as well.
On selecting Condition, you will see the If Condition option, which allows you to identify the object around which the condition needs to be written. You can select from the below options.
-
Variable: Variable allows you to manually add an attribute from the Trigger configuration. On selecting Variable, field-specific data points will be seen as below:
- Variable: Select the Variable name that you want to base the condition on.
- Operator: Select an operator that you want to define the condition with. It can be any of the following:
- Equals
- Starts With
- Ends With
- Contains
- In
- Greater Than
- Less Than
- Greater than or Equal
- Less than or Equal
- Is
- Value: Specify the value for the condition, based on which the "If-else" condition will be applied.
-
HTTP Status Code: You should select this option while creating a condition based on the HTTP status code of an API Call action. The status code can be anything, be it success (
200,201,2xxetc.) or failure (4xxor5xx). On selecting HTTP Status Code, field-specific data points will be seen as below:- Operator: Select an operator that you want to define the condition with. It can be any of the following:
- Equals
- Starts With
- Ends With
- Contains
- In
- Greater Than
- Less Than
- Greater than or Equal
- Less than or Equal
- Is
- Value: Specify the value for the condition, based on which the "If-else" condition will be applied.
- Operator: Select an operator that you want to define the condition with. It can be any of the following:
-
HTTP Response: You should select this option while creating a condition based on the HTTP response of an API Call action. The response can be a string or a JSON key. On selecting HTTP Response, field-specific data points will be seen as below:
- HTTP Response: Specify the condition based on the response of the API call. For instance, if the response looks like
{status: "ok"}, then the value of the HTTP Response field will bestatus. If the response is nested like{status: {response: "ok"}}, the value of the field will bestatus.response. - Operator: Select an operator that you want to define the condition with. It can be any of the following:
- Equals
- Starts With
- Ends With
- Contains
- In
- Greater Than
- Less Than
- Greater than or Equal
- Less than or Equal
- Is
- Value: Specify the value for the condition, based on which the "If-else" condition will be applied.
- HTTP Response: Specify the condition based on the response of the API call. For instance, if the response looks like
How to Configure Callback
This option allows you to receive Delivery reports of each notification triggered in any URL you have allowlisted in Fyno. It can be done in 2 ways.
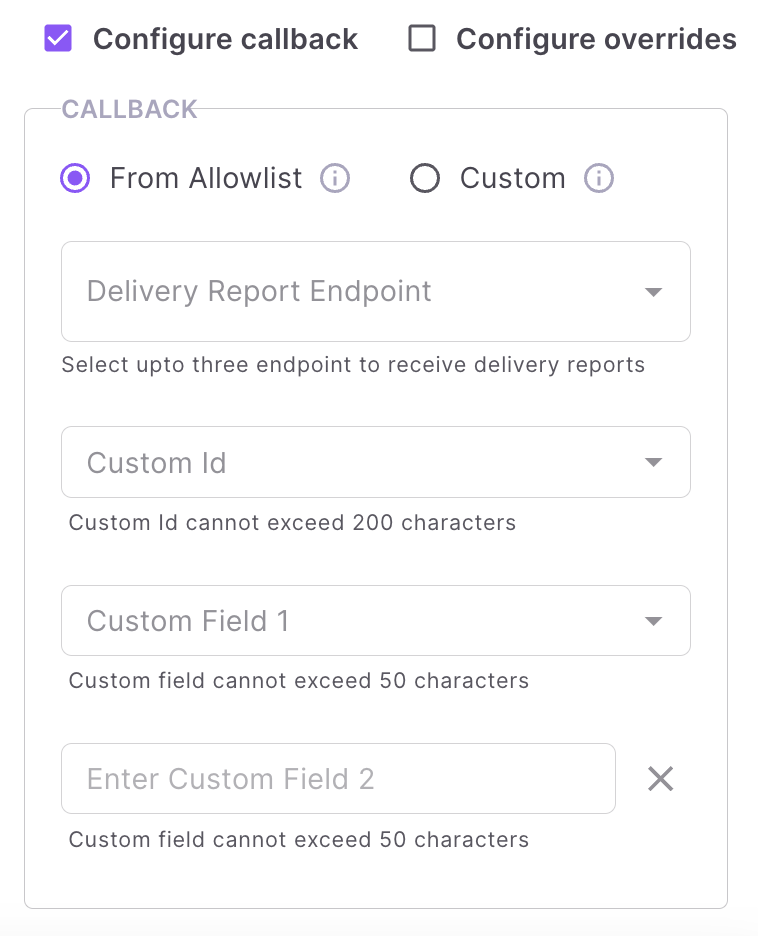
- From Allowlist - Selecting Delivery Report Endpoint(s) from Verified Allowlist URLs (Maximum 3 can be selected).
- Custom - Selecting Delivery Report Endpoint from payload. (Only 1 can be selected).
Once the Delivery Endpoint URL(s) is selected, 3 additional placeholder details need to be configured.
| Placeholders | Default Value | Meaning |
|---|---|---|
| Custom Id | custom_id | ID you provided in the callback.custom_id field while triggering the notification. |
| Custom1 | msg_id | Message ID generated for every notification sent from Fyno. |
| Custom2 | status | status of the message such as Delivered, Opened, Read etc. |
More values can be added in the callback. For a list of additional available values, please see:
https://docs.fyno.io/docs/allowlist-url#callback-response
How to Configure Overrides
This option allows you to configure dynamic parameters in automation. For instance, if you require using different email IDs for various notifications within an automation, you can achieve this by configuring overrides.
For instance, suppose you've set up [email protected] as the from_email address during SES integration configuration, but wish to utilize [email protected] to initiate a notification within an automation. You can achieve this by following the steps below.
- Enable 'Configure Overrides' checkbox as shown below.
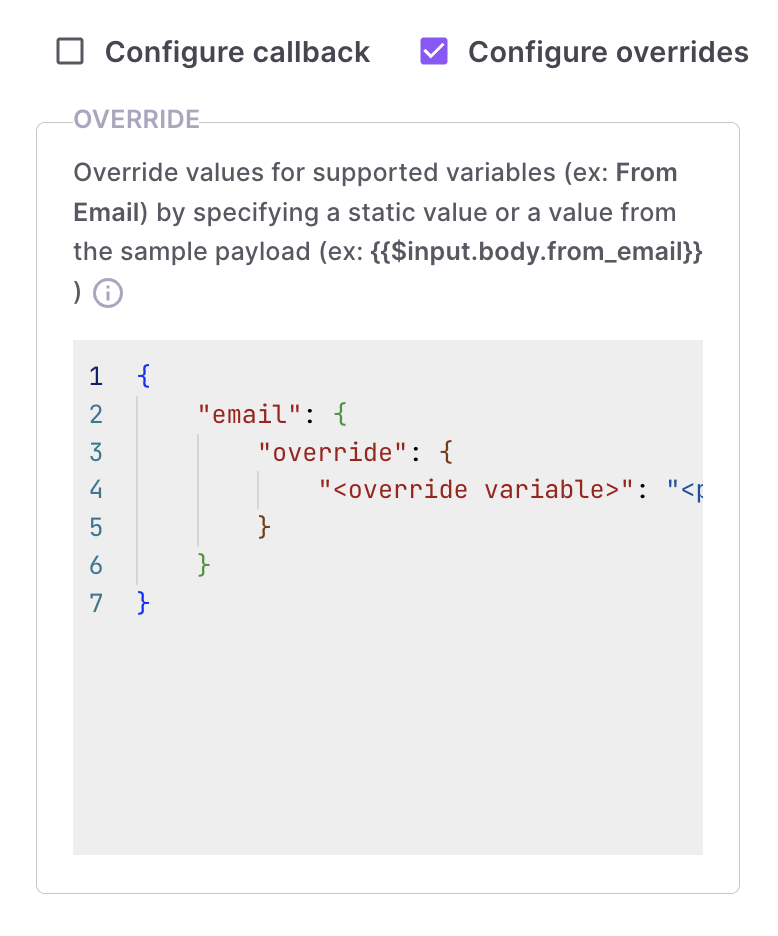
- You will see sample payload as shown below.
{
    "email": {
        "override": {
            "<override variable>": "<payload key/custom value>"
        }
    }
}
- Substitute with the variable you configured on the integration page. For instance, if you have 'from_email', you can configure it as shown below. {{$input.body.channel.email.override.from_email}} is where the value of 'from_email' is sent in the payload.
{
    "email": {
        "override": {
            "from_email": "{{$input.body.channel.email.override.from_email}}"
        }
    }
}
Creating Successful Automations
Successful automation is created when you have a workflow that has a closed loop for all the aspects of the possible outcomes.
Closed loop means, ending the branch of it in an Action or a Stop block. The end block cannot be a Condition block, why you ask? Because it doesn't make sense.
The way how we look at successful automations in Fyno is when we are able to chalk out every possible outcome and address or have an Action for each of these.
How do we narrow down the flow to come to an Action? By specifying the Conditions. Simple!
And at the end of the flow, we select Stop to round off and end a successful workflow!
You can create any number of Conditions based on which there would be a specific Action that is taken to address the said workflow.
Updated 10 days ago