Template Message
Template Message you to add pre-configured templates from the WhatsApp Business Manager platform.
- Synced Templates: These templates are directly synced from Meta or Business Solution Providers (BSPs).
- Non-Synced Templates: For platforms like Freshchat that do not support template syncing, you'll need to configure templates created in BSPs. All details need to be mentioned as per WhatsApp template created.
To use any user property in your templates, you can add it in this format - {{$user.$<user_property>}}. For example, to add Name as placeholder from User profile, you can add it as {{$user.$name}}. If you want to use any custom property, then you can use it as {{$user.<user_property>}}
Synced Templates
- Template Name: You can select a pre-populated template from the drop-down or you can type the name manually too! Learn how to sync your WhatsApp External Templates from your providers now!
All the fields are auto-populated once you select the template name.
-
Language: This field will indicate the language of the template content, and it will be automatically filled in.
-
Header Type: This can be Text, Image, Video or File.
-
Header Placeholder: This field will be utilized if there are any placeholders, such as "Name," in the header. It will be automatically populated, and only one placeholder can be added to the header.
-
Body Content: This comprises the main content of the message and will be visible exclusively for Gupshup Enterprise. For all other Business Solution Providers (BSPs) or Meta platforms, this field will not be visible.
-
Body Placeholders: You must specify the placeholders mentioned in your body of your synced template here.
-
Footer: This is an optional field. This is generally used for signatures or sign-offs.
-
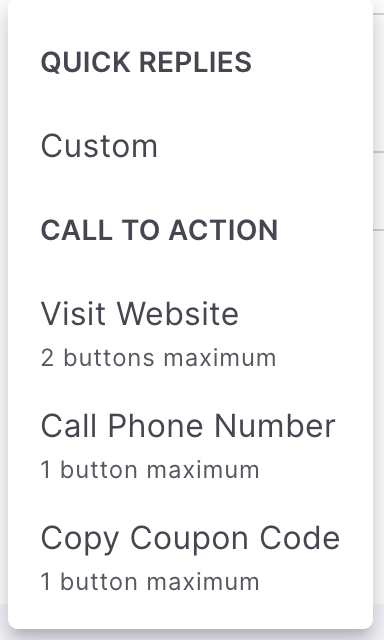
Buttons: Buttons can take the form of Quick Reply (Custom), Click to Action (Visit Website, Call Phone Number, Copy Offer Code) or a combination of these options.
-
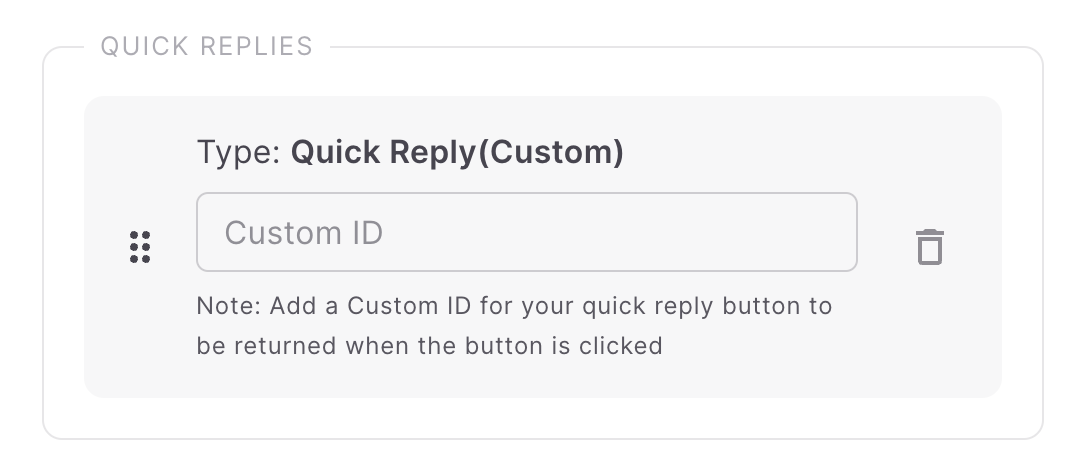
Quick Reply: Every Quick reply will have a unique Id and you can override the id by entering a custom id for them. For example, you added unique id as 'Good Product' and you can override it by adding a custom id like 'Good'. You will receive the custom ID in Fyno's Inbound logs page if someone clicks the Quick reply.
-
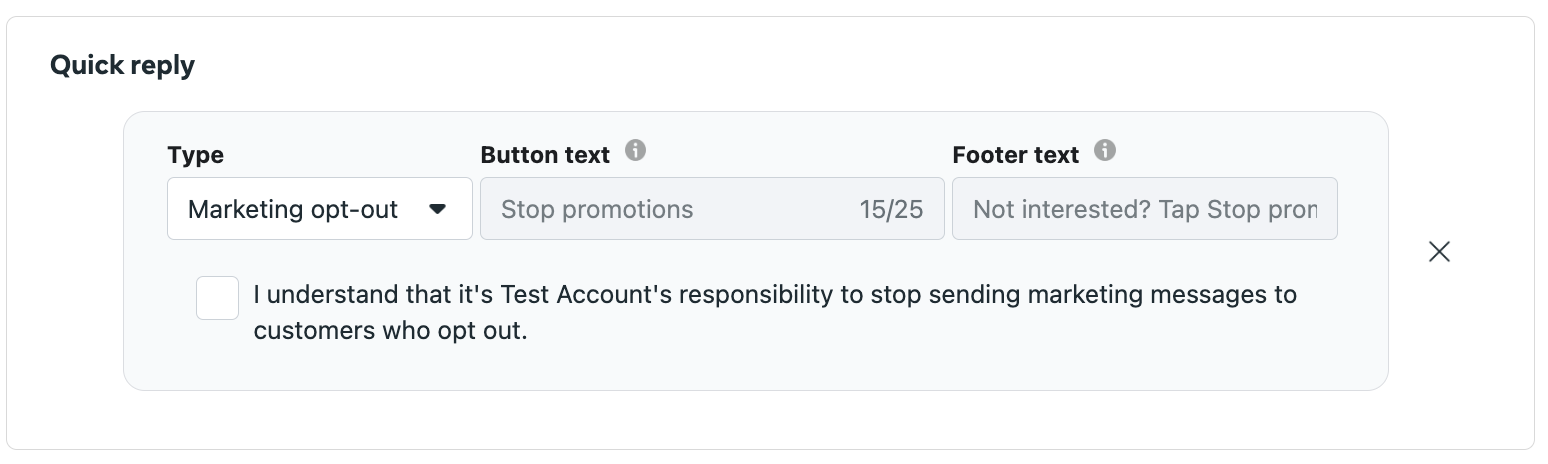
Marketing opt-out : This is recommended if the category is Marketing. Button text and Footer text are pre-configured in Meta and can't be edited. In Fyno you need to configure it as shown below. When user click 'Stop Promotion' in WhatsApp message, we will automatically add the user to the Opt-out list (WhatsApp channel) for the Subscription topic linked to the notification event.

-
Call Phone Number: The Phone number configured in Meta or BSP won't be shown here.
-
Click To Action: For example, you can add a CTA for website link as shown below in Meta. Website URL will be root URL like https://fyno.io/ or https://www.myntra.com/ etc. If you choose URL type as Dynamic, you need to provide Sample URL as shown below. if the URL type is static, you don't have to add any sample URL.
-
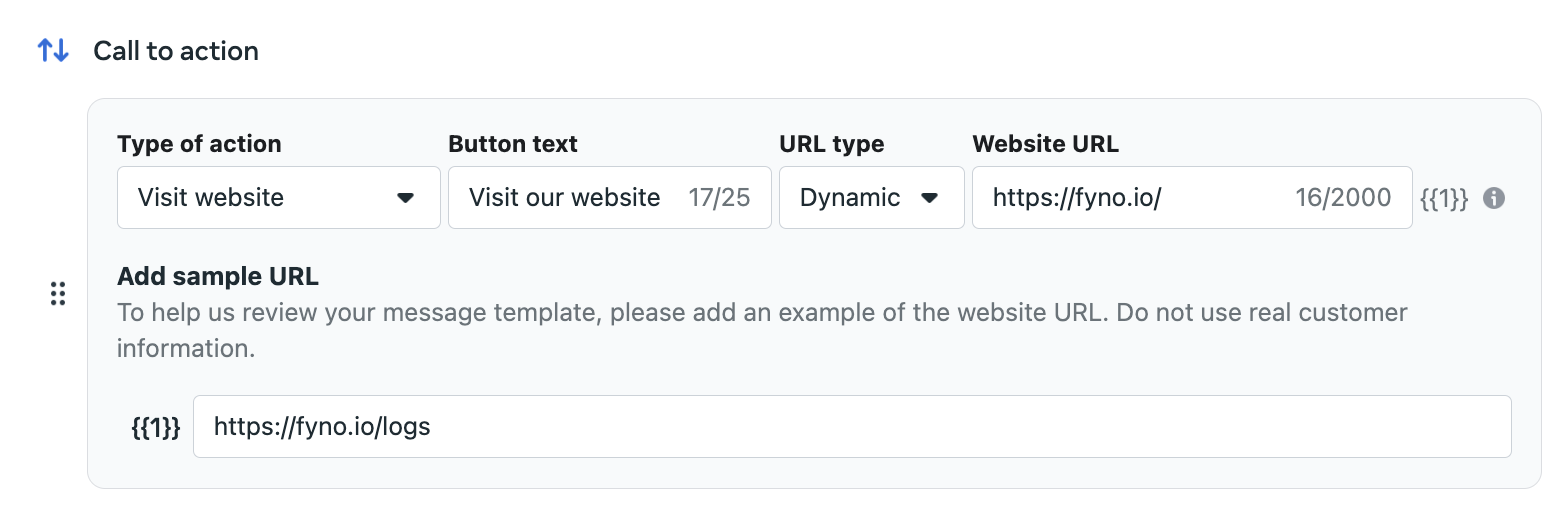
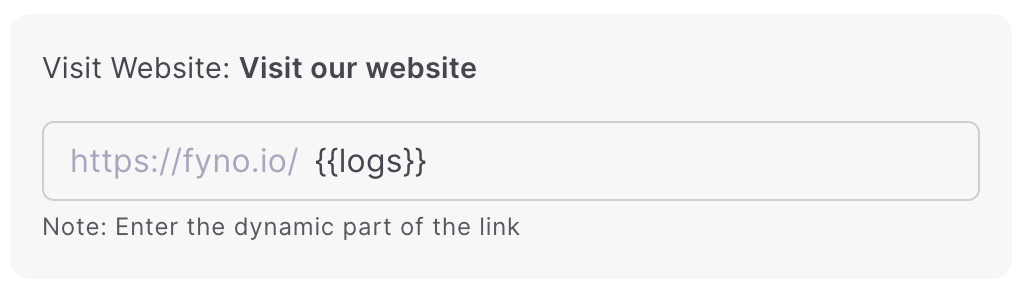
In Fyno, you need to add the dynamic placeholder as below.
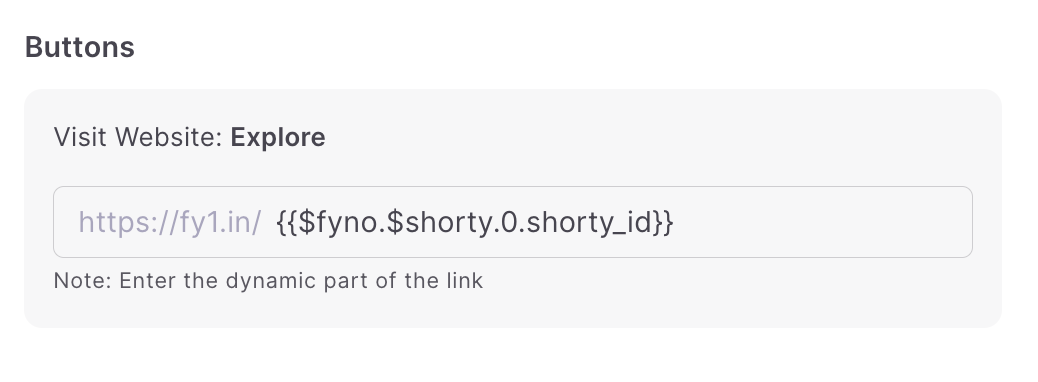
In case of shortened URLs, it will work as below. In Meta, you will configure the URL shortened using Fyno Shorty as shown below. Use Fyno Shorty, if you want to shorten your URL or you want to track the URL clicks or both.
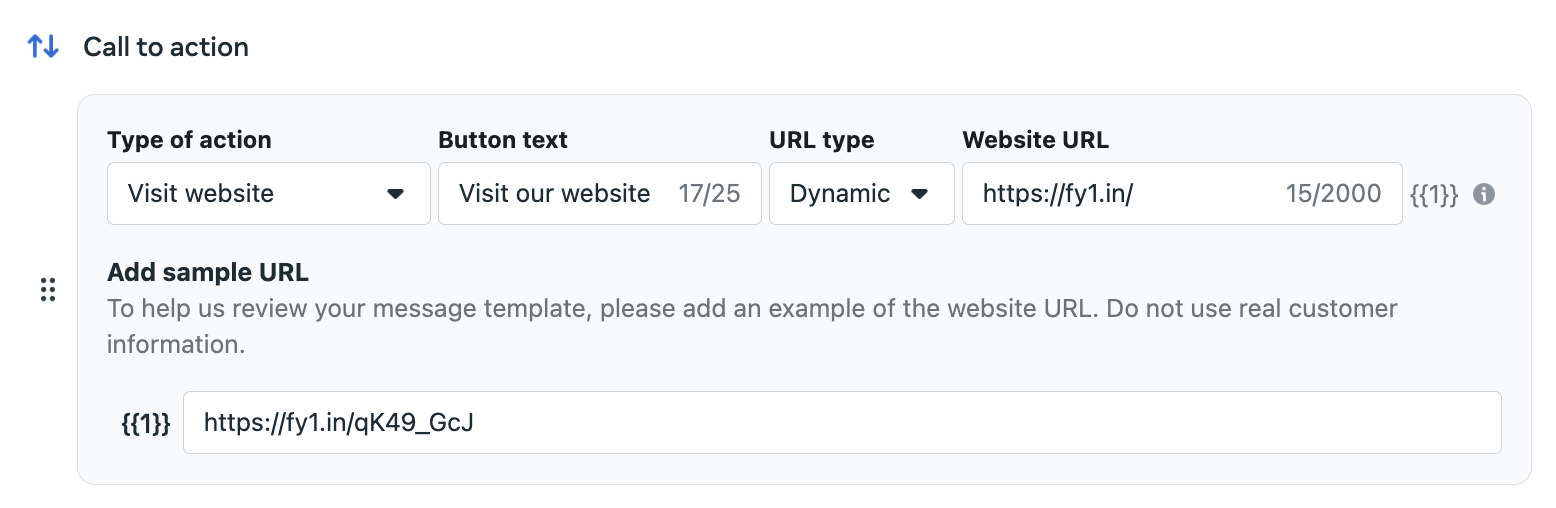
Ensure that the Website URL is always set to https://fy1.in/ when you use Fyno Shorty to shorten the URL.
In Fyno, you will configure it as shown below. If you have more than 1 URL, then for the first URL, add {{$fyno.$shorty.0.shorty_id}}. For the second URL you need to add {{$fyno.$shorty.1.shorty_id}} and so on.
-
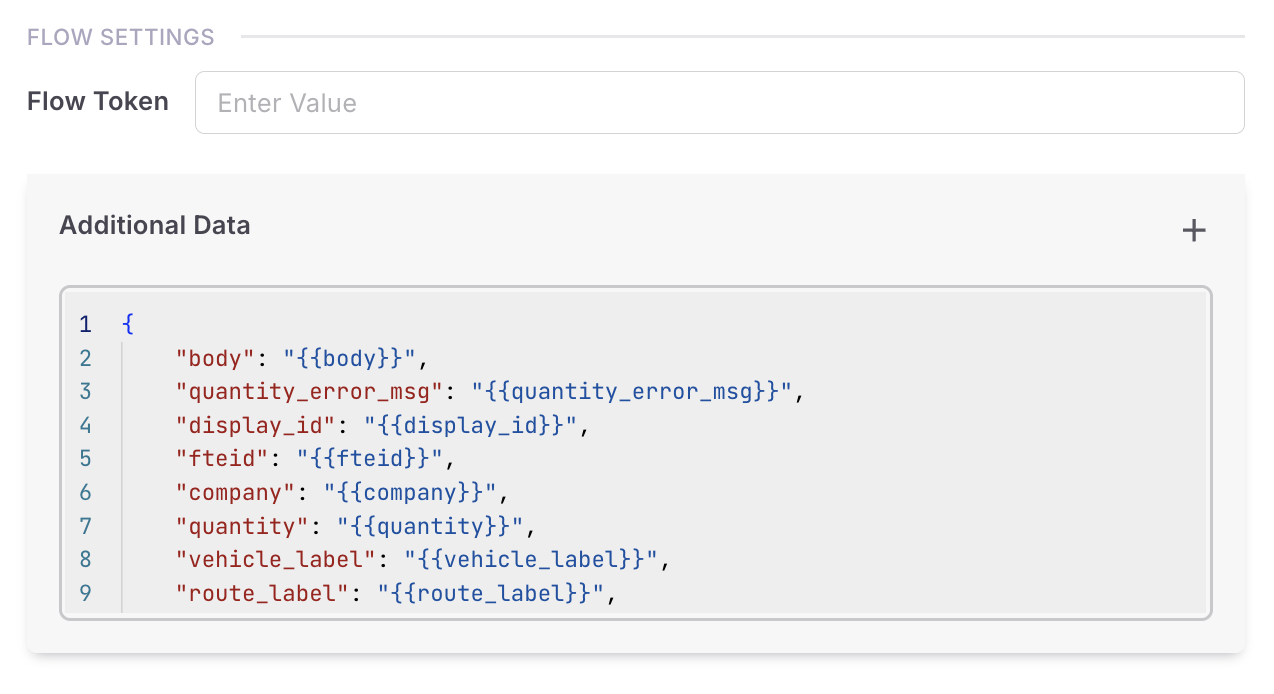
Flow Settings:
-
Flow Token (Optional) - You can add a unique Id for your flow or use 'unused'.
-
Additional Data (Optional) - If your flow needs any data payload, you can use additional data as json payload
-
Non-Synced Templates
WhatsApp Template registration process for Gupshup Enterprise
Gupshup Enterprise requires you to provide the body of message content even for templatized messages. So, when you configure a Gupshup Enterprise account in our provider list, you will be required to provide the body of the message for them
In the case of Non-Synced Templates, you must input all the particulars of the template that has been created in WhatsApp Business Manager.
-
Template Name: Provide the template name created in WhatsApp Business Manager.
-
Language: You will need to key in the language as well as per the name provided on WhatsApp Business Manager.
-
Message Type: This can be Text, Image, Video or File.
-
Header Placeholder: This field is optional. If the Header has any placeholder, add it here. Only 1 placeholder can be added to header.
-
Body Content: This comprises the main content of the message
-
Body Placeholders: You must specify the placeholders mentioned in your registered template here
-
Footer: This is an optional field. This is generally used for signatures or sign-offs.
-
Button: This is optional. Buttons can take the form of Quick Reply (Custom), Click to Action (Visit Website, Call Phone Number, Copy Offer Code) or a combination of these options. When You click 'Add Buttons' you will see the below options.
Quick Reply - Custom
- While adding a quick reply button, you need to add Custom ID which is configured in Meta. You have the flexibility to add as many quick reply buttons as needed.
-
Marketing opt-out: You need to add Marketing opt-out as Quick Reply button. When user click 'Stop Promotion' in WhatsApp message, we will automatically add the users to the Opt-out list (WhatsApp channel) for the Subscription topic linked to the notification event.
Call To Action
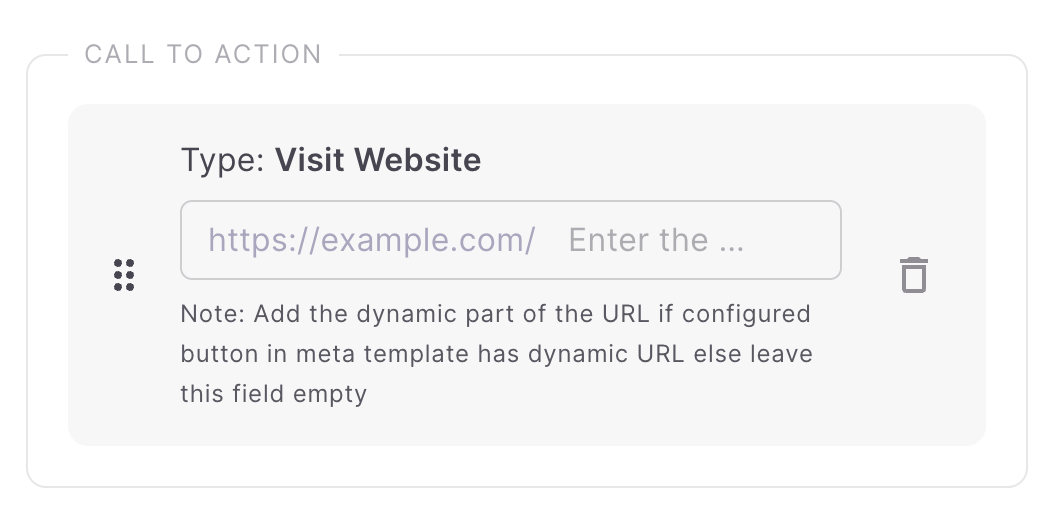
- Visit Website - You need to add placeholder if you have added CTA with Dynamic URL in Meta template.
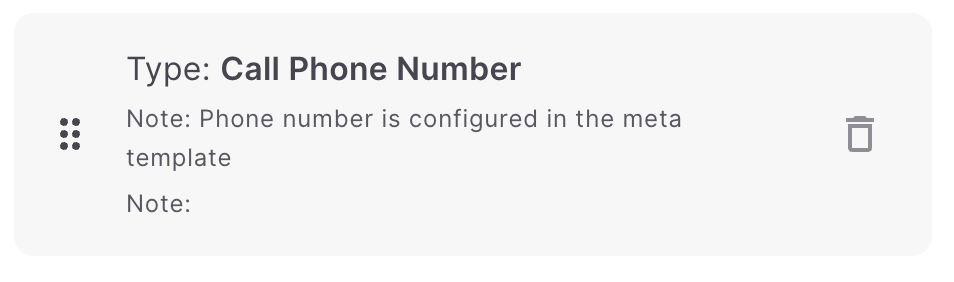
- Call Phone Number - You don't have to input anything as the mobile number is already configured in Meta template.
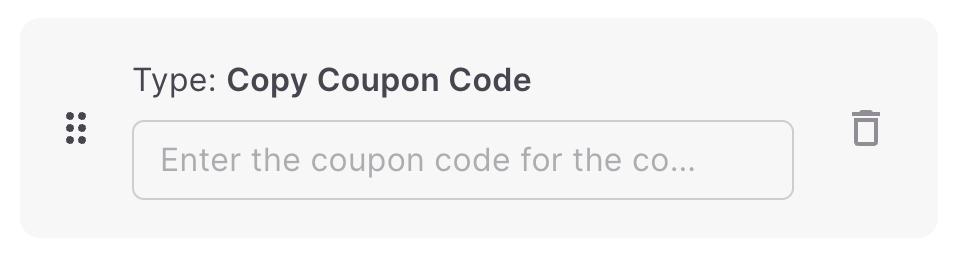
- Copy Coupon Code - Enter the coupon code which you want to send along with WhatsApp message.
How to test WhatsApp template
You can use this feature to conduct thorough testing of a template prior to its inclusion in any Notification Event. This ensures the early detection and resolution of any potential issues, ensuring a seamless user experience.
- Click 'Run Test' on the top right hand side of the template.
- It opens the pop up as shown below.
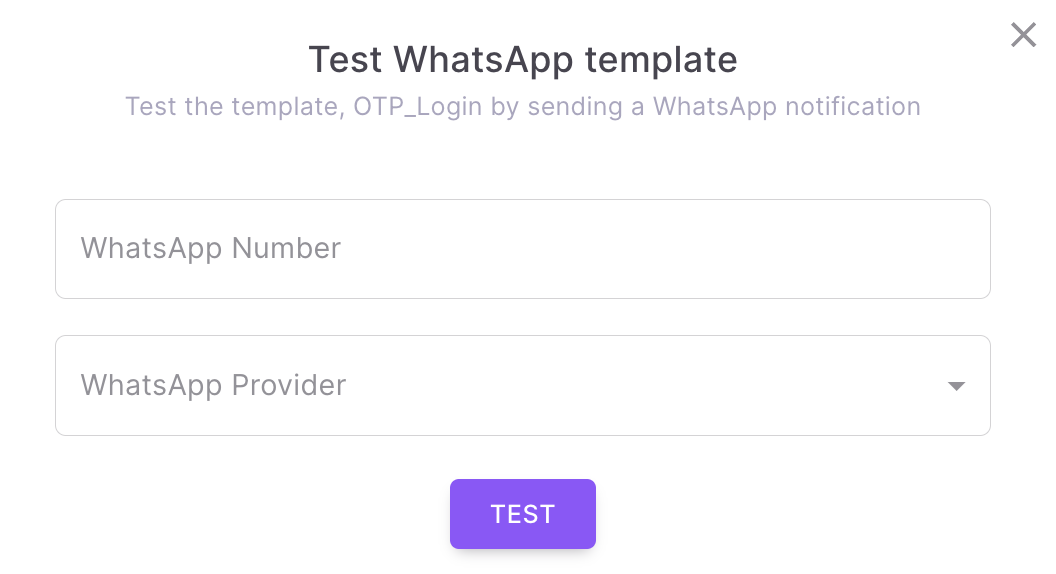
- Enter the mobile no of the recipient where the WhatsApp should be sent.
- Select a WhatsApp service provider which is already configured in Fyno. If you are using a synced template make sure to use the same provider using which the template was created, to test the template.
- When you click 'TEST', it will send WhatsApp message to the recipient with the selected service provider. You will see the success or failure message along with the link for Sent Logs.
Preview
Review your content and take a look at what your message would look like in the Preview section on the right. If you have configured a Non-Synced template, you won't be seeing any preview.
Save & Go Live:
Save and create different versions of the templates by hitting Save which will be Test versions. Use Go Live when you are ready to move your template into the "Live" version.
Placeholders
Placeholders: Below the "Channels" section on the left, you can find placeholders. Placeholders are denoted by {{}} or Handlebars. You may define the parameters of Placeholders by clicking on it, which opens up a pop-up window where you can define them. Check out this comprehensive guide on how to use "Handlebars"
Did you know?
You can use period (.), underscore (_) or hyphen (-) within the handlebars. Try it now!
You cannot use only numeric values as placeholder keys!
WhatsApp URL Redirection will not work!
When providing the URLs for files in the WhatsApp templates, redirected links (with multiple hops) will not work as per Facebook Policies.
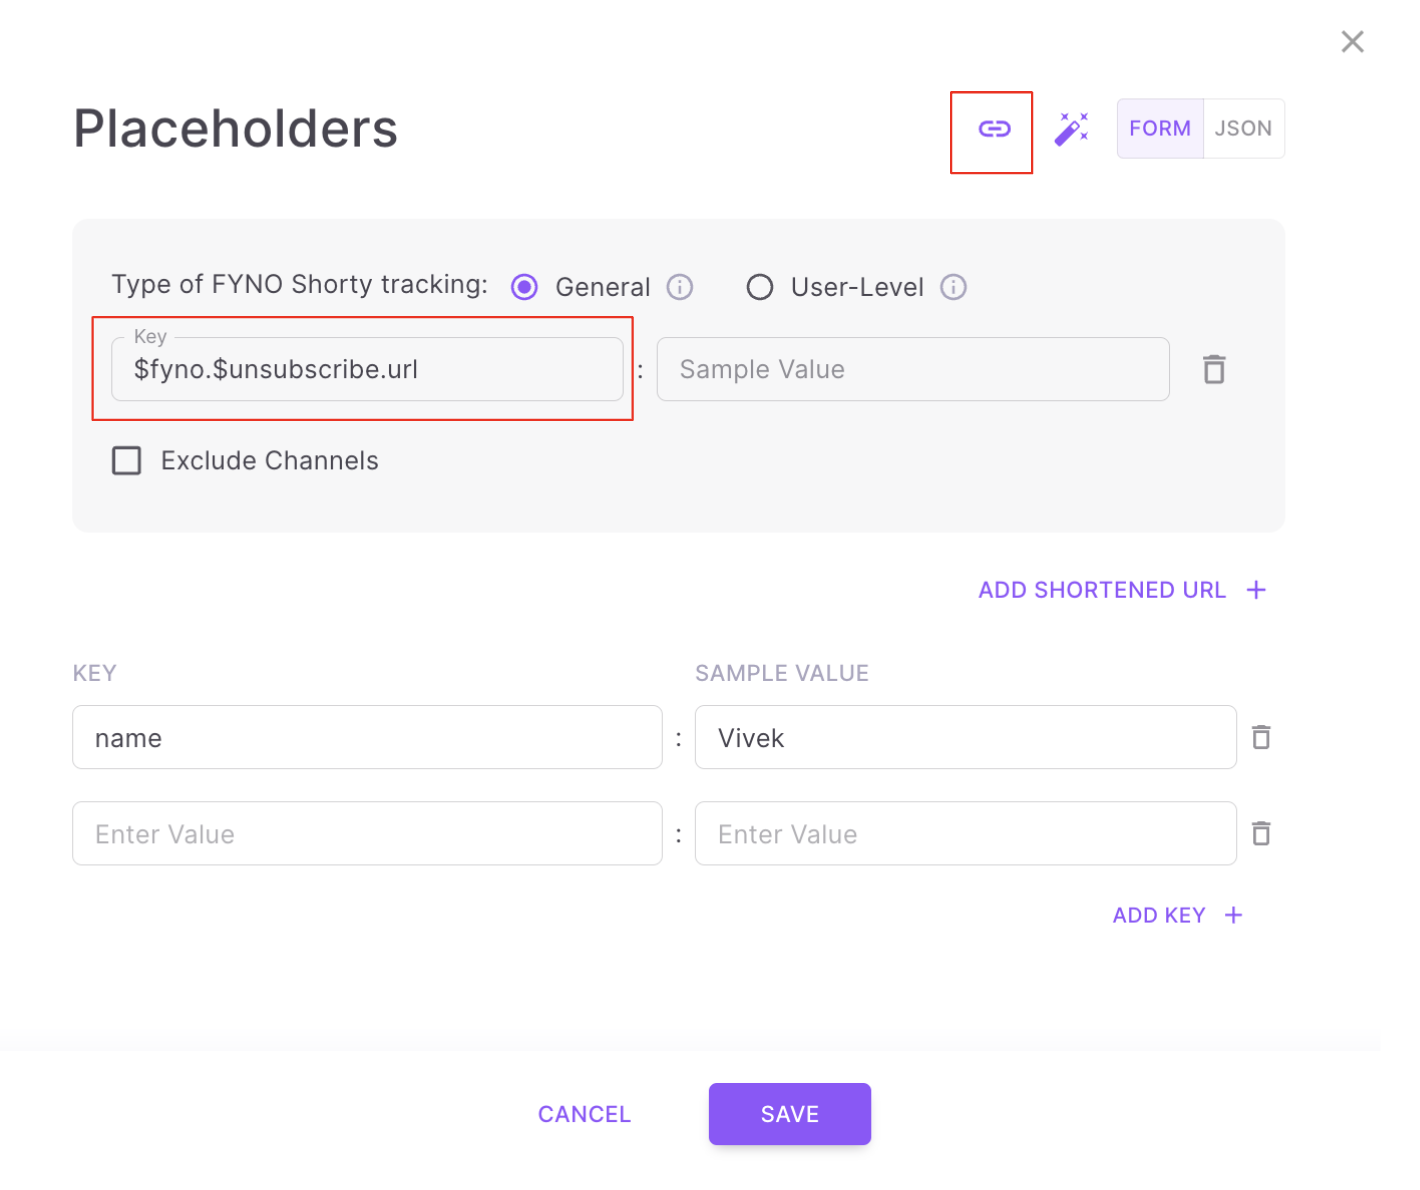
How to add Unsubscribe link
-
You can add actual Unsubscribe URL as a placeholder in the WhatsApp template
-
If you want to reduce the Unsubscribe URL length for better user experience, we recommend you to use Fyno Shorty to shorten the URL.
-
To use Fyno Shorty, enable it by going to Workspace Settings -> Add On's -> Fyno Shorty.
-
You should add $fyno.$unsubscribe.url as key in the placeholder as shown below.
Updated 4 months ago