Fyno Connect

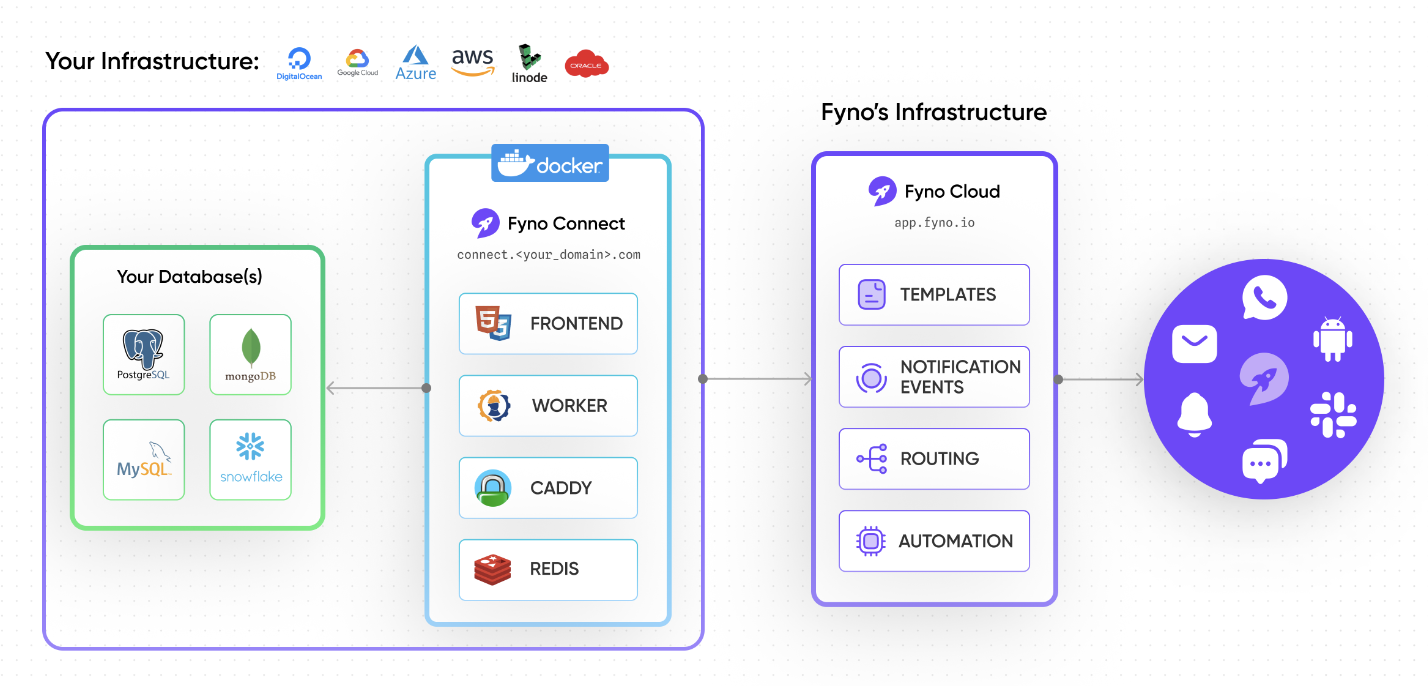
Fyno Connect serves as your solution for directly creating user cohorts from your Database (DB) or Data Warehouse (DW). This application runs on your infrastructure, guaranteeing 100% security.

Fyno Connect comes with a pre-configured integration with our Fyno cloud platform. This allows you to initiate any communication you've designed on the cloud platform directly to users through cohorts you've created on Connect. All of this is accomplished without the need for concerns about API integration or coding.

Prerequisites for Fyno Connect

Before installing Fyno Connect, you will need to have the following:

  1. A Fyno Cloud account, preferably with a few templates, routes and notification events created and ready for testing.
  2. A VM (Virtual Machine), where this instance of Fyno Connect will be set up. This can be anything from AWS EC2 to Azure Compute Services, whichever best suits your set-up and needs. Please install the latest version of docker in this VM.
  3. A CNAME or A record pointing your Fyno Connect sub-domain (example: connect.example.com) to this VM.
  4. Allow public access to ports 80 and 443 of this VM for automatic SSL certificate creation. This can be disabled later.

Setting up and installing Fyno Connect

  1. In your VM, install the latest version of docker and docker-compose.
  2. Download the Fyno Connect zip file (we will share this with you) in the VM and extract the files.
  3. Edit the .env file in the folder where you have extracted the zip file. In this file add your Fyno Workspace ID and API Key details. You can fetch these values from Fyno Cloud API Keys page.
FYNO_WSID=<your_fyno_workspace_id>
FYNO_API_KEY=<your_fyno_api_key>
  1. Next, edit the Caddyfile located in the docker-data folder. Add your email ID, which will be used to create your SSL certificate, and the address of the domain you would use for Fyno Connect.
{
    email <YOUR_EMAIL>
}

connect.example.com {
    handle_path /api/app/* {
        reverse_proxy connect-frontend:4005
    }
    handle {
        reverse_proxy connect-frontend:3000
    }
}

  1. Once done, run the start.shshell script to startup Fyno Connect.
./start.sh

OR 

sh start.sh
  1. If the setup is successful, you will be able to access Fyno Connect via the sub-domain (example: connect.example.com) you used above.
  2. You may now restrict public access for ports 80 and 443 to your Fyno Connect domain.

👍

delete.sh and update.sh works too!

For when you want to remove Fyno Connect or update it!

Using Fyno Connect

You can access Fyno Connect using the sub-domain you created earlier (example: connect.example.com).

Let's have a look around Fyno Connect and understand what you can achieve with it.

Databases

Fyno Connect works by directly connecting with your database and giving you a platform to essentially create cohorts and mould your data without having to extract it.

Supported databases to connect:

  1. MongoDB
  2. Snowflake
  3. Postgres
  4. MySQL (coming soon)

1. MongoDB

To connect to MongoDB,

  1. Navigate to Databases and click on MongoDB
  2. In the pop-up, enter a name for the new connection and paste the MongoDB connection string or URL.
  3. Click on "Add Database" to test the connection and successfully save it.

👍

Make sure your MongoDB connection string is on point!

The standard connection string format looks like:

mongodb://[username:password@]host1[:port1],host2[:port2],...[,hostN[:portN]]][/[database][?options]]

2. Snowflake

To connect to Snowflake,

  1. Navigate to Databases and click on Snowflake
  2. In the pop-up, enter the following details.
  • custom name - Unique name to identify your snowflake connection in Fyno.
  • accountname - Refer this doc to learn how to identify or retrieve the account name from your Snowflake account.
  • username
  • password
  • warehousename
  • dbname
  1. Click on "Add Database" to test the connection and successfully save it.

3. Postgres

To connect to Postgres,

  1. Navigate to Databases and click on Postgres
  2. In the pop-up, enter a name for the new connection and paste the MongoDB connection string or URL.
  3. Click on "Add Database" to test the connection and successfully save it.

👍

Make sure your Postgres connection string is on point!

The standard connection string format looks like:

postgresql://[user\[:password\]@][netloc][:port][/dbname][?param1=value1&...]

Once the Database has been added successfully, you will see it listed on the same page under Connected DBs

On clicking on any of the connected databases, you will be able to view all the collections and their data in a tabular form. Filtering the data as per your needs is also possible by either applying filters or writing a query.

This gives you a better understanding as well as visualization of the data you are working with, allowing you to build cohorts easily.

Cohorts

A Cohort is a collection or a segment of users created on a set of filters or a database query. This allows you to segment users based on any criteria and send targeted messages to them.

A few examples of filters include filtering by specific status, location, or sign-up date range. There are countless other possibilities that you can explore by using different combinations of filters or writing your own query.

How to create a cohort

Let's have a look at how to create a cohort.

  1. From the left navigation panel, click on Cohorts. On the page that opens, click on "Create Cohort".
  2. In the pop-up, provide a relevant name for the cohort, select a database to create the cohort and click on "Submit".
  3. On submitting, a new page will open consisting of a dropdown menu with the list of all the schemas present in the selected database.
  4. Select a schema and view its data in a tabular form below. Apply filters, or run a query on it to get the desired segment of users.
  5. Click on "Save Cohort" to save the selected schema and the applied filters or query to complete the cohort creation process.
  6. Alternatively, you can click on the dropdown next to "Save Cohort" and select "Save and Create Campaign" to not only save the cohort but also create a campaign from it.

Filters and Query Builder

Filters and Query allow you to get the segment of users for certain conditions or factors.

  1. Filters Builder: A powerful visual builder using which you can apply a set of filters to the schema data to get the desired output. This builder consists of 3 major components: rule, group, and combinator.

    1. Rule: It is the most important component as it consists of the single condition or the filter that needs to be applied.
      A rule is created by combining 3 things:
      Rule = Key + Operator + Value
      The "Key" is the column name or the object key from your schema. It is present as a dropdown menu with a list of column names or object keys from your schema.
      The "Operator" is the operation or check that is to be performed between the key and the value. It is present as a dropdown menu with a pre-defined list of operators.
      The "Value" is the data value that you input. The data type of this field will depend on the "Key" selected and will change as you change the selected "Key".
      Example of a rule: Age > 30, Company = Fyno, Email ends with @fyno.io, and many more.
    2. Group: A group is a collection of rules that can be used to organize filters and create complex filters by combining multiple groups with different combinators.
    3. Combinators: Determine how 2 rules or groups will combine together in order to form a complete condition or a filter. It can have 2 values:
      1. AND: The "AND" combinator evaluates to true if both of its rules or groups are true. If at least one of the it is false, the entire combined condition evaluates to false. The "AND" operator can be thought of as representing the intersection of conditions.
      2. OR: The "OR" operator evaluates to true if at least one of its rules or groups is true. If both are false, the entire combined condition evaluates to false. The "OR" operator can be thought of as representing the union of conditions.
        After completely adding all the rules and groups, hit the "Apply" button to filters and view the updated data below.

        📘

        The rules and groups are draggable!

        Use the drag handles to rearrange them and test different combinations of filters :)

  2. Query Builder: A simple code editor to write or paste your db queries and run it directly on the schema data to get the desired output. This editor gives you more freedom as you can write as complex a query as you can and also helps you reuse what you have already written someplace else.
    It's essential to use the appropriate query when working with different databases. For instance, MongoDB requires a JSON-formatted Aggregation Pipeline query which looks like this:

    [
      {
        "$match": {}
      }
    ]


📘

Introducing Magic Query Generator! (Beta)

The Magic Query Generator is an innovative and powerful feature designed to simplify and streamline the process of creating database queries. With this, generating database queries is as simple as providing a prompt in plain English.

By eliminating the need to write queries manually, the Magic Query Generator empowers you to retrieve, filter, and manipulate data from the database with ease and efficiency.

Just write out what exactly you want the data to be comprised of with all the conditions, and hit the "Generate Query" button. The query will auto run after successfull generation and you can view the results.

Modify the query or the prompt until you get the desired output.
Give it a try!

Campaigns

Campaigns allow you to trigger bulk notifications to a select group of users that you have created via Cohorts through a specific Notification Event that you have pre-created in Fyno Cloud.

To get started with Campaigns on Fyno Connect,

  1. Click on Campaigns from the left navigation bar. On the new page, click on Create + to create a new campaign. In the pop-up, fill in:
    1. Name: Provide a suitable name for the campaign
    2. Campaign Type: Select the type of campaign. This can be:
      1. Engagement
      2. Onboarding
      3. OTP
      4. Promotional
      5. Retention
      6. Transactional
    3. Select Cohort: Select a cohort you would like to use. In case you selected "Save and Create Campaign" while saving a cohort, this would be pre-filled.
  2. Once this information is filled click on "Next". At this step, you will need to configure the Notification Event details by entering the following:
    1. Notification Event Name: Select the name of a pre-created notification event from Fyno Cloud.
    2. Select One time or Recurring Campaign
    3. To: Select the channel, based on the configured details in the Notification Event and select a corresponding header from the cohort created for the same. For example, if the selected channel is Email, then the corresponding header from the data that contains the email IDs to execute these emails will need to be selected.
    4. Data: Placeholders can be specified using this section, to correspond and pick up data from the headers of the cohort created. For example, if the email contains a placeholder called "Shoe Brand" then the corresponding column header containing that information needs to be selected.
  3. Once this information is filled in, click on "Next Step". Here, you will be able to test the campaign before executing it, just to ensure that the notification event is correctly configured and the data points are correctly reflecting.
  4. To test, enter a test number under the To field and click on "Trigger Campaign".

Only when the notification event is successfully called, will the campaign get created and triggered!

Recurring Campaigns

Frequency - Select the periodicity of the campaign. You can choose from four options: Month, Week, Day, Hour.

  • Day - You can select every hour or a particular time like 1 PM or more than 1 time slot like 1 PM, 4 PM etc.
  • Week - You can select Every day of the week or a particular day like Monday or few days like Monday, Friday. You also need to select the time slot when you want the campaign to be executed.
  • Month - You can select a particular day of the month and particular days in a month and also the time slots.

When the campaign ends - Select after how many times you want the campaign to end.

👍

Your logs are safe with us!

For every campaign triggered by you via Fyno Connect, the logs will be visible on Notification Event logs as well as Sent Logs. Head on over to the Logs section and find insights about your campaign