Voice Templates
Handling Templates on Providers' side
Since Fyno works with a multitude of providers, it is important to understand how each provider works and to send data to their systems in a way that they accept and can process.
Keeping that in mind, let's have a look at how to configure templates based on the provider you are using.
Kaleyra
IVR
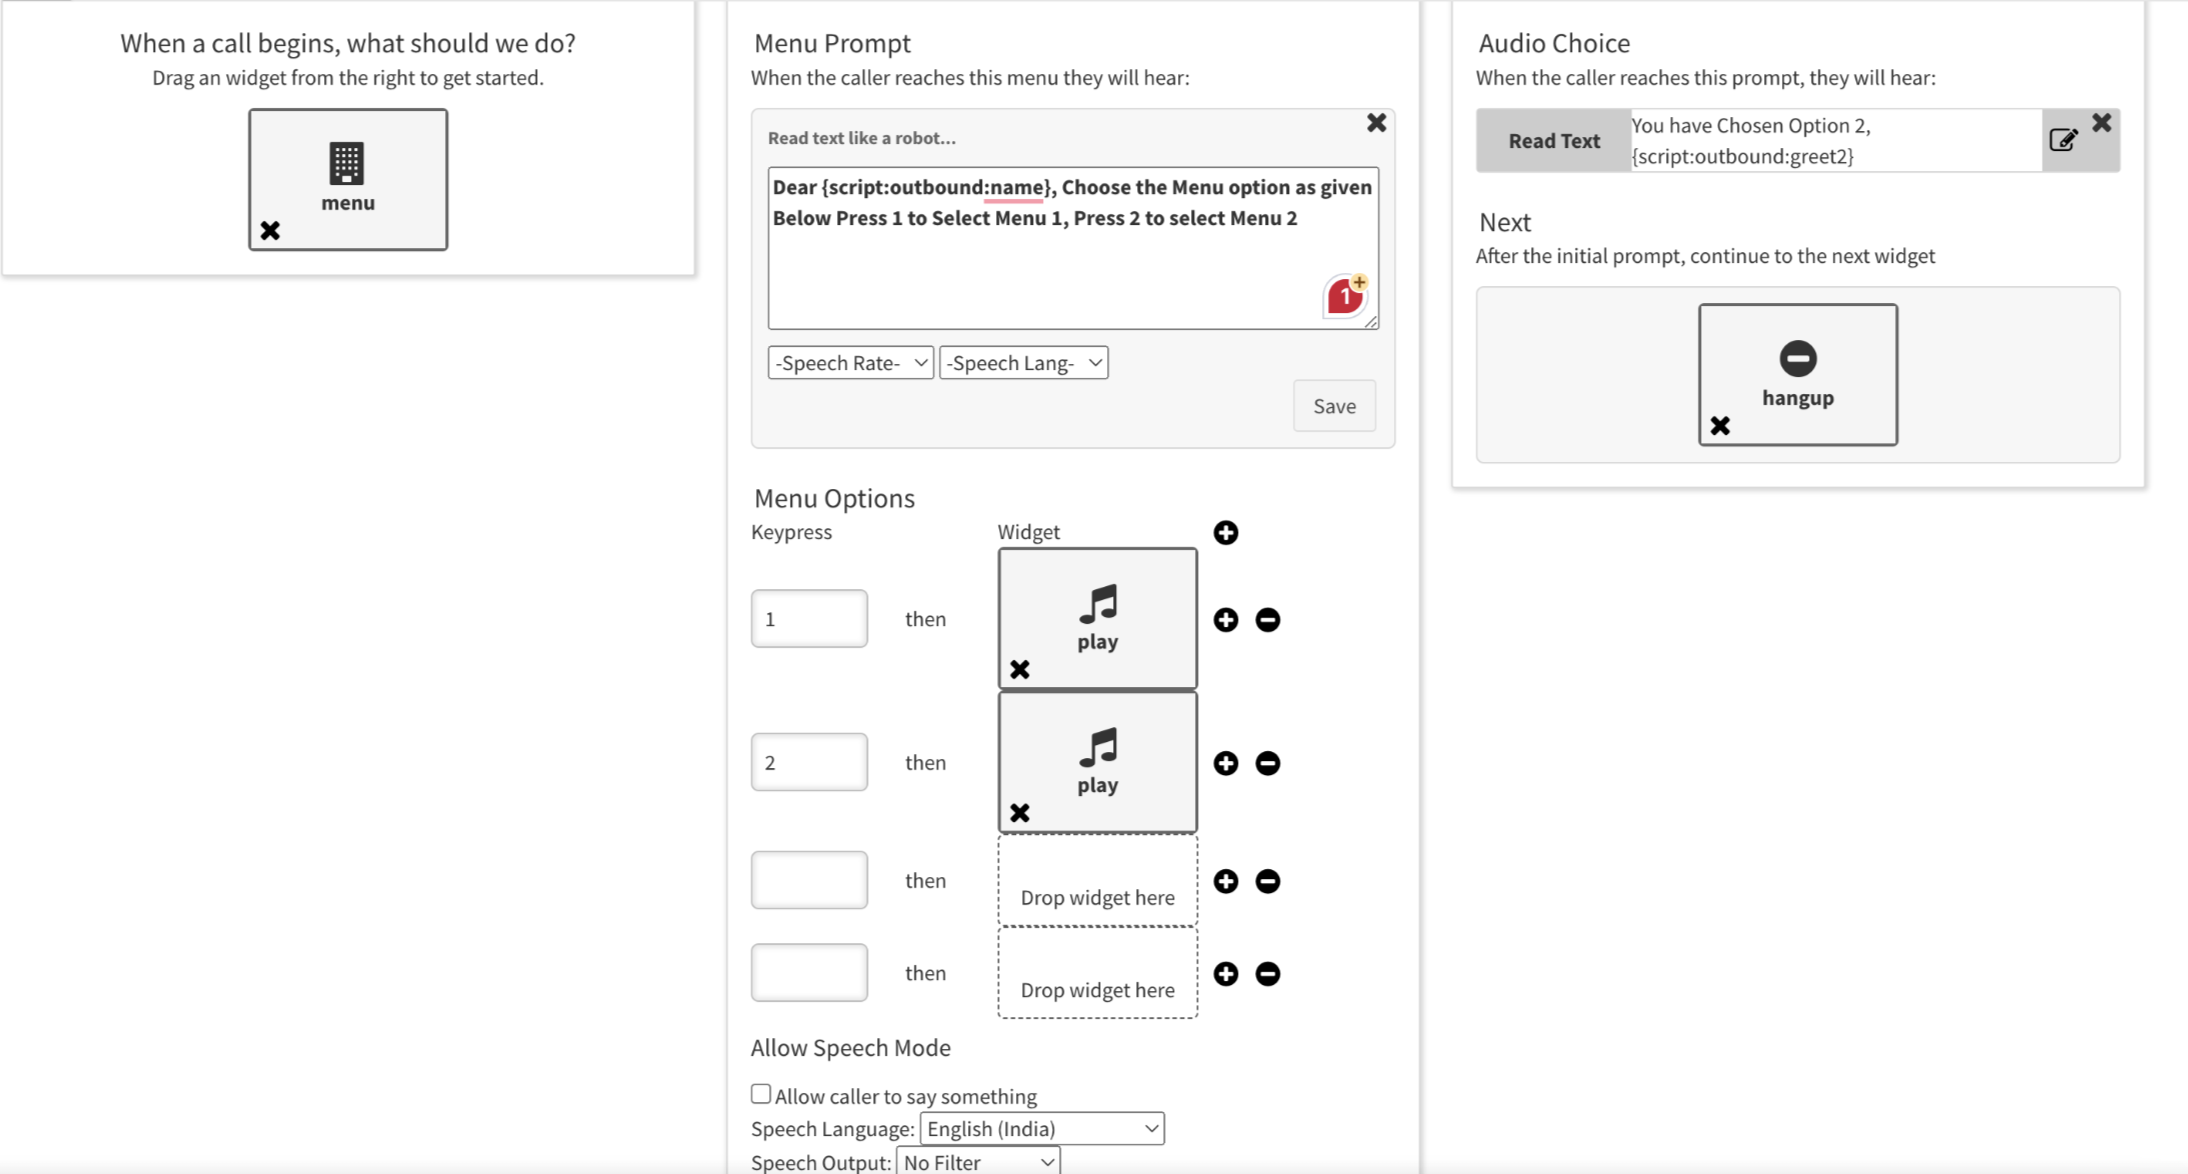
- Metadata values are used in text-to-speech widgets to create dynamic text and convert it to speech.
- Use
{script:outbound:metadata-key-name}to access meta values while configuring it in Kaleyra voice. - For example, if you want to configure a menu with 2 options and 3 placeholders script:outbound:name, script:outbound:greet1 and script:outbound:greet2, it needs to be done as shown below.
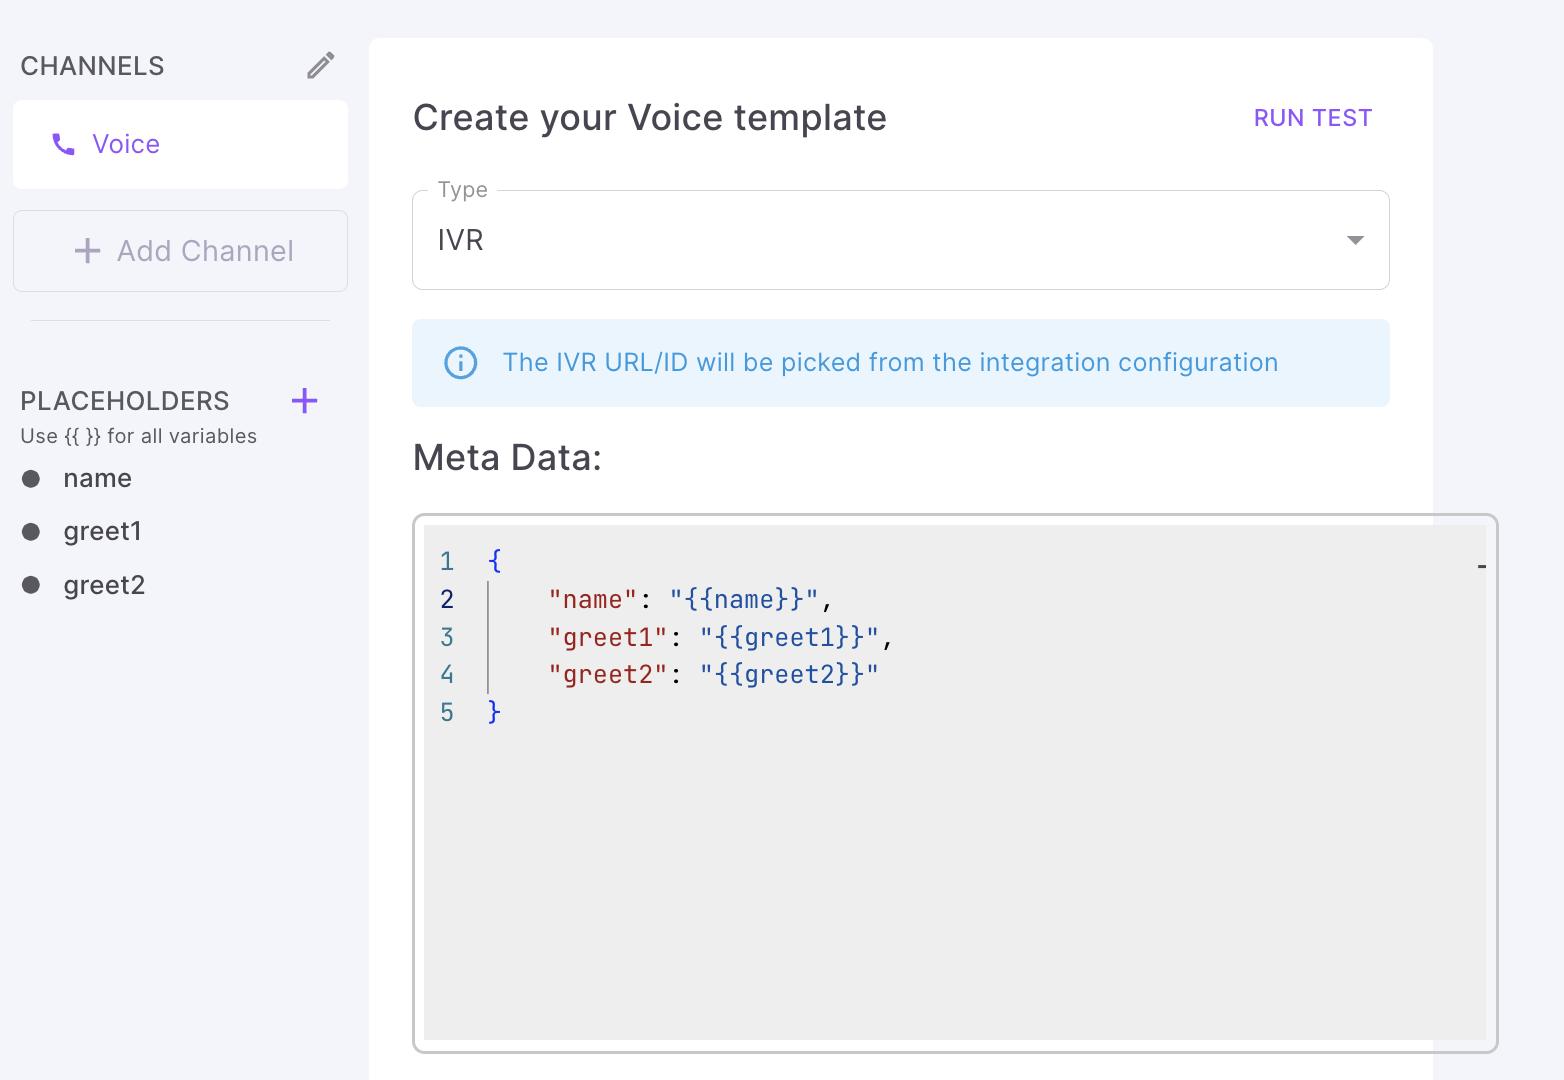
- In Fyno, you need to add the metadata as shown below.
Call Connect
- This is used for connecting two calls, also known as "Call Bridge."
- From: Number of the first leg (usually a business/agent/customer care person). Can be a static value or configured as {{from}} to be dynamically controlled.
- Second Leg Number: A customer number passed in the request payload inside a "to" object. This number will be visible and searchable on the sent logs page.
- Example Request Payload:
{
  "event": "<EVENT_NAME>",
  "to": {
    "voice": "usually a customer Phone number",
    ...
  },
  "data": {
    "from": "usually the number of business/agent/customer care person"
  }
}
IVR or Call flow is not required for the Call Connect option! 🎉
You can now achieve this by simply providing this data in the above format and it will initiate the Call Connect!
Text-to-Speech
- Fyno prepares dynamic content and passes it to Kaleyra using OBD calls.
- The content is played over a call, with a delay of 5-10 seconds depending on content length.
- Just go ahead and type the content you need to be read out and the same will be played on the OBD call.
Exotel
IVR
- In Exotel, Metadata values are used in text-to-speech widgets to create dynamic text. Configure the endpoint provided in the Fyno voice template section to access dynamic text.
- For example, if the metadata value is
{ "Text2Play":"Dear Username, This is Sample text to speech play with dynamic content" }, it can be used in IVR text-to-speech greeting widget as<https://api.fyno.io/v1/><WORKSPACEID>/dynamic/text/textkey=Text2Play - This endpoint provides dynamic text for the call.
- For Keypress capture, while configuring Fyno callback, use the Passthu widget in the Exotel Plotform. Add the callback URL in both to capture DTMF on keypress for each assigned keypress.
Call Connect
- This is used for connecting two calls, also known as "Call Bridge."
- From: Number of the first leg (usually a business/agent/customer care person). Can be a static value or configured as {{from}} to be dynamically controlled.
- Second Leg Number: A customer number passed in the request payload inside a "to" object. This number will be visible and searchable in the sent logs page.
- Example Request Payload:
{
  "event": "<EVENT_NAME>",
  "to": {
    "voice": "usually a customer Phone number",
    ...
  },
  "data": {
    "from": "usually the number of business/agent/customer care person"
  }
}
IVR or Callflow is not required for the Call Connect option! 🎉
You can now achieve this by simply providing this data in the above format and it will initiate the Call Connect!
Text-to-Speech
- Text-to-speech is supported via IVR calls currently. Fyno prepares the dynamic content and is accessible by an endpoint which needs to be provided in the Fyno voice template section.
- To Play this text over call via Exotel, you will need to create an IVR flow. In Exotel, under the Greetings widget configure the endpoint as
<https://api.fyno.io/v1/><WORKSPACEID>/dynamic/text/textkey=text2speech. This endpoint will return dynamic text to play for the given call.
Setting up Voice Templates on Fyno
On clicking on Voice Templates, you will see:
- Type: Select the type of call you plan on triggering. This can be:
- Call Connect: This type of voice call allows you to connect 2 numbers, on each leg of the call. Essentially, the first leg of the call will be your bridge number and the 2nd leg of the call will be the recipient of the call. This is also the feature used, when call Masking is implemented for your voice call number services.
- From: Enter the number you want to use for the first leg of the call. This can be the assigned number for your phone number. You can also use placeholders here to define a field in the payload to pick this information from.
- Metadata: Specify the metadata here, that you would like to share with the provider on triggering this call.
- Text to Speech: Type in the text you want to be read out. This will then be spoken out when the call is connected with the end recipient.
- IVR: The IVR information that was configured on the integration page will be picked up to execute the IVR. Specify the metadata that you would like to share with the provider on triggering this call.
- Call Connect: This type of voice call allows you to connect 2 numbers, on each leg of the call. Essentially, the first leg of the call will be your bridge number and the 2nd leg of the call will be the recipient of the call. This is also the feature used, when call Masking is implemented for your voice call number services.
- Save & Save and Promote: Save and create different versions of the templates by hitting Save which will be Test versions. Use Save & Promote when you are ready to move your template into the "Live" version.
How to add dynamic content in template
You can add dynamic content in your templates using one of the 4 options mentioned below.
How to test Voice template
You can use this feature to conduct thorough testing of a template prior to its inclusion in any Notification Event. This ensures the early detection and resolution of any potential issues, ensuring a seamless user experience.
- Click 'Run Test' on the top right hand side of the template.
- It opens the pop up as shown below.
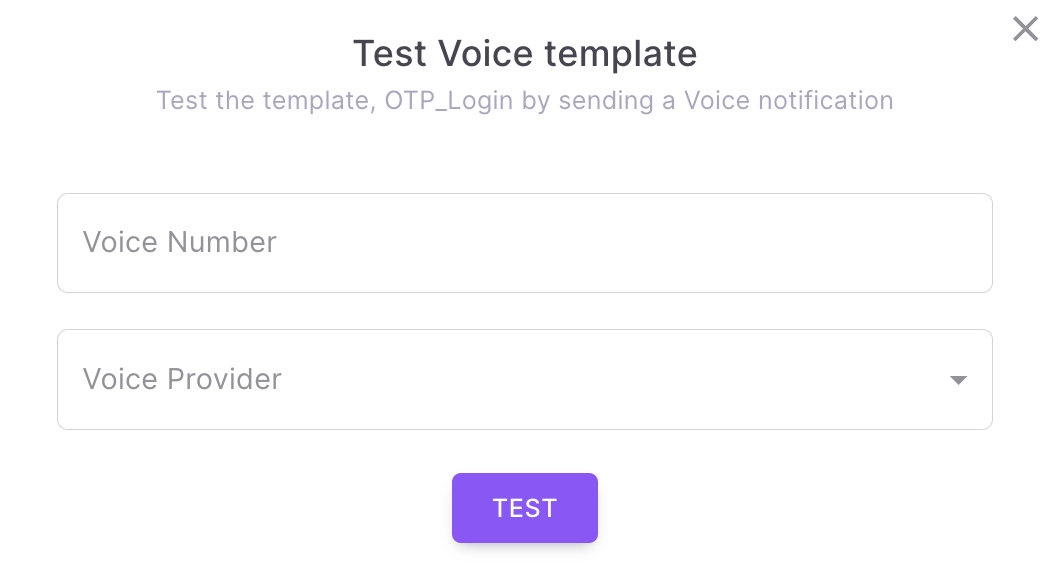
- Enter the Mobile no of the recipient where the Voice message should be sent.
- Select a Voice service provider which is already configured in Fyno.
- When you click 'TEST', it will send Voice message to the recipient with the selected service provider. You will see the success or failure message along with the link for Sent Logs.
Updated about 1 month ago