Creating a journey
Fyno Journey is an all-in-one omnichannel marketing solution designed to empower Product, Growth and Marketing teams.
Journeys lets you create an automated omnichannel notification experience for your users using a visual journey builder. It consists of a series of notification events, each engaging the user with the most relevant content at the right moment, resulting in the desired conversion.
Fyno Journeys can be crafted to engage users at every phase of their lifecycle within your product, leveraging user and event data to create highly personalized experiences.
When can you create a Journey?
A Journey can be delivered at any stage of the user's lifecycle. Few examples below.
- User Onboarding: Build an onboarding Journey that engages users over several days or weeks and on different channels to educate them about your product's unique features.
- Payment Reminder: Build a payment reminder flow to nudge users to make the payment like SIPs, EMIs on time.
Steps to Create a Journey
- Define Journey Entry - Define when the journey should be started. You can select the trigger of any notification event as Journey entry point
- Define Unique Identifier - Define how you want to identify your user. You can select any fields from the payload as unique identifier.
- Define Journey Exit (Optional) - Define when the user will exit the journey successfully. You can select the trigger of any notification event as Journey exit point.
- Define Journey Path - Define what are the different notifications user should get during their journey. You can also add any wait time between 2 different notifications so that users can do the required action and exit the journey.
- Save and Promote the journey - Once all the above steps are done, you can save it or promote it.
Use Case
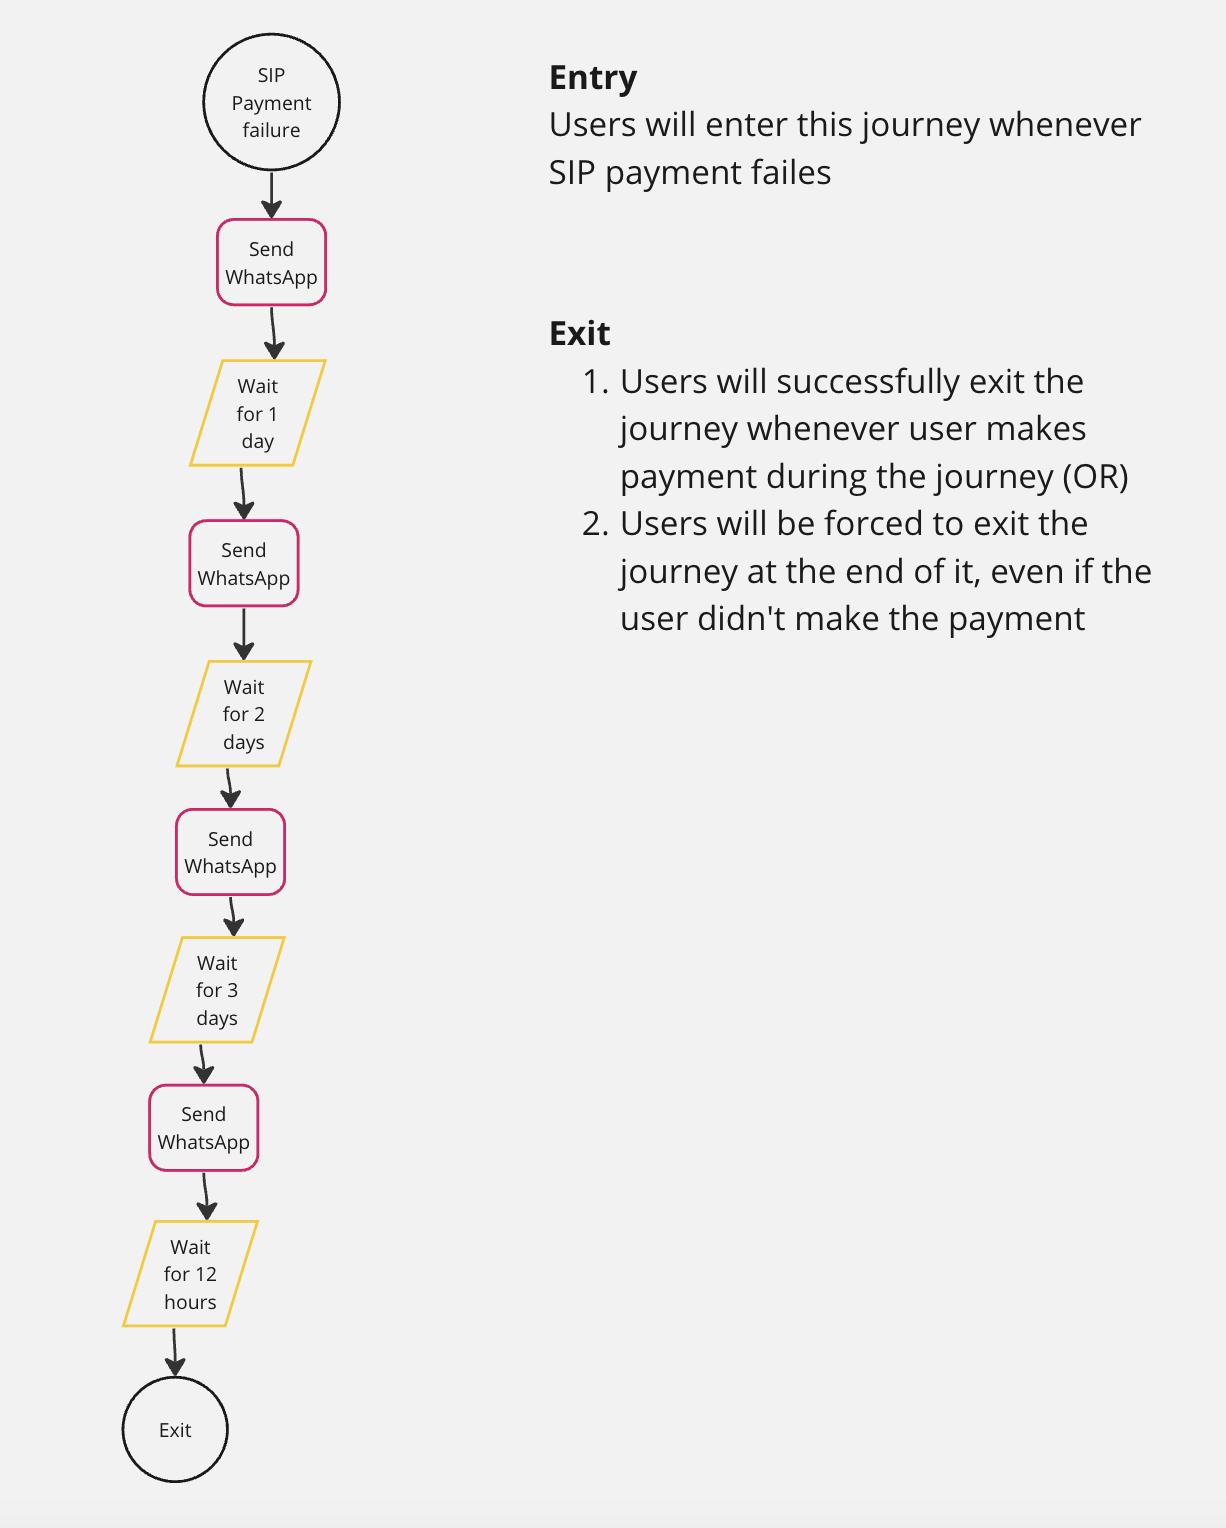
Let's take the example of ABC, a fintech company that aims to ensure users complete their SIP payments even after an initial failure. To achieve this goal, ABC plans to implement a multi-step reminder system. The system will send payment reminders at various intervals following the payment failure, such as 1 day, 2 days, 3 days etc after the initial failure. These reminders will continue until the user successfully makes the payment. However, if the user does not complete the payment within 10 days of the original payment failure, ABC will discontinue the reminder notifications. If the user makes the payment within 10 days, they will stop getting reminders.
Let's assume ABC send these payment reminders via WhatsApp. Visual representation for the flow is shown below.
To achieve the above use case, you need to follow the below steps.
-
Go to Navigation menu -> Workflow.
-
Click 'Create+' to create a new workflow.
-
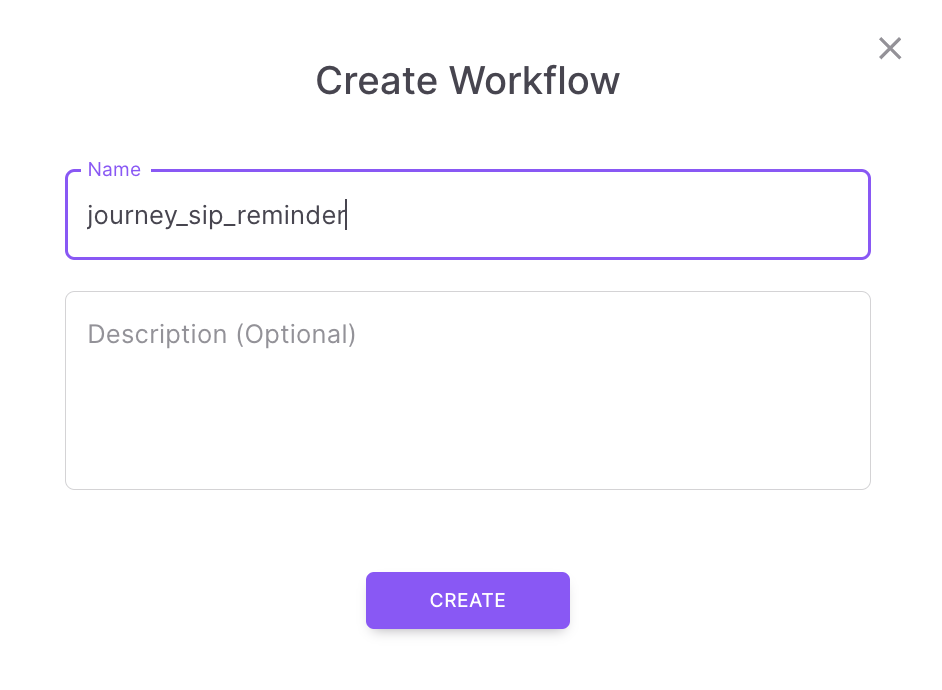
Enter an appropriate name for your workspace and click 'Create'.
-
You will see an empty canvas as shown below

-
From the panel on the right hand side, drag and drop 'Notification Event' into the canvas. You need to configure the following
-
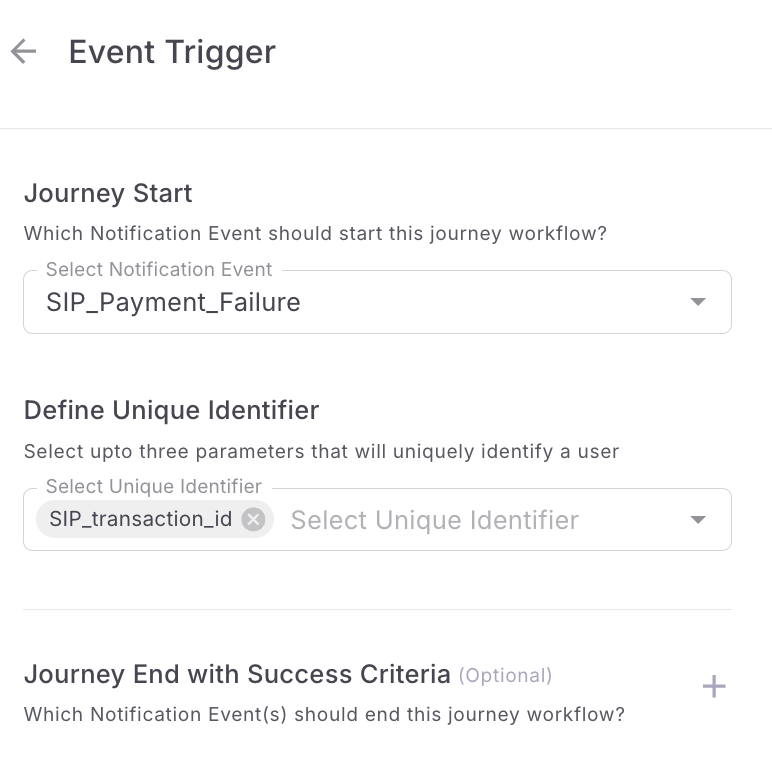
Journey Start - Select the notification event which will start the journey. In this use case, SIP payment failure notification event will start the journey
-
Unique Key - You need to select one or more keys as Unique Key which will unique identify your user. Every SIP will have a unique Transaction Id. So, in this use case, we will choose it as Unique Key.
-
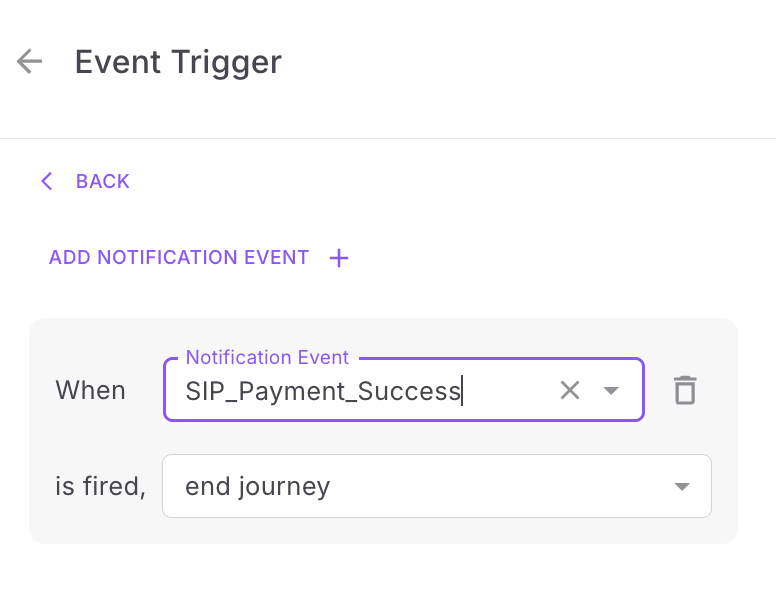
Journey Success Criteria based on Notification Event - Select the notification event which will successfully end the journey for the user. In this use case, SIP payment success notification event will end the journey for the user.
-
Journey Success Criteria based on Notification Event Status - You can end Journeys based on the status of notifications. For instance, you can set up a journey to end when a user has either read the 'SIP_Payment_Success' notification on WhatsApp or opened the corresponding email. This can be configured as shown below:
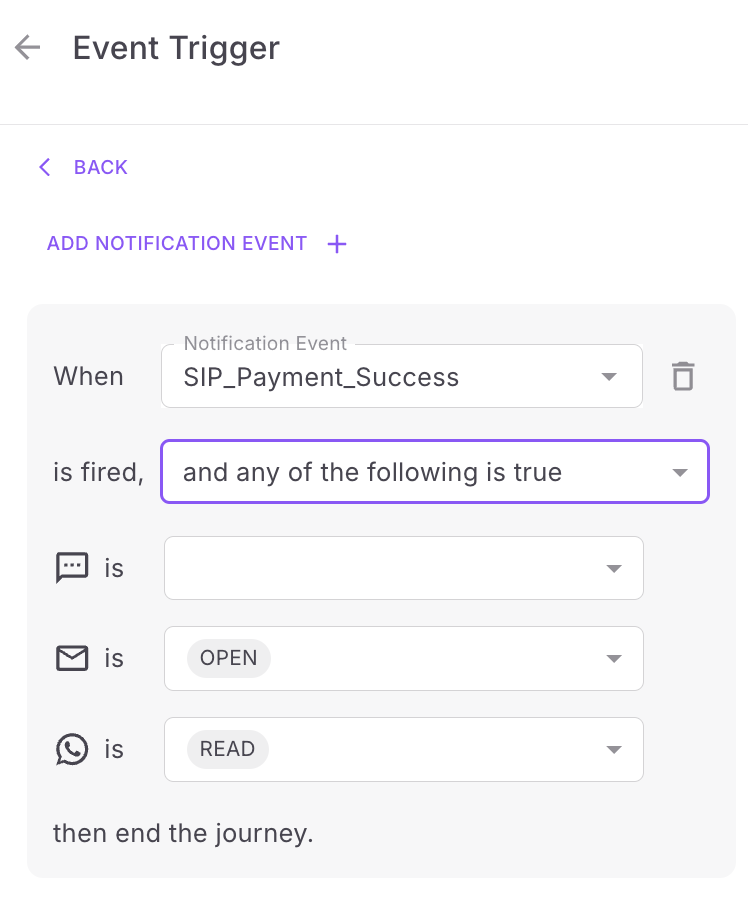
-
-
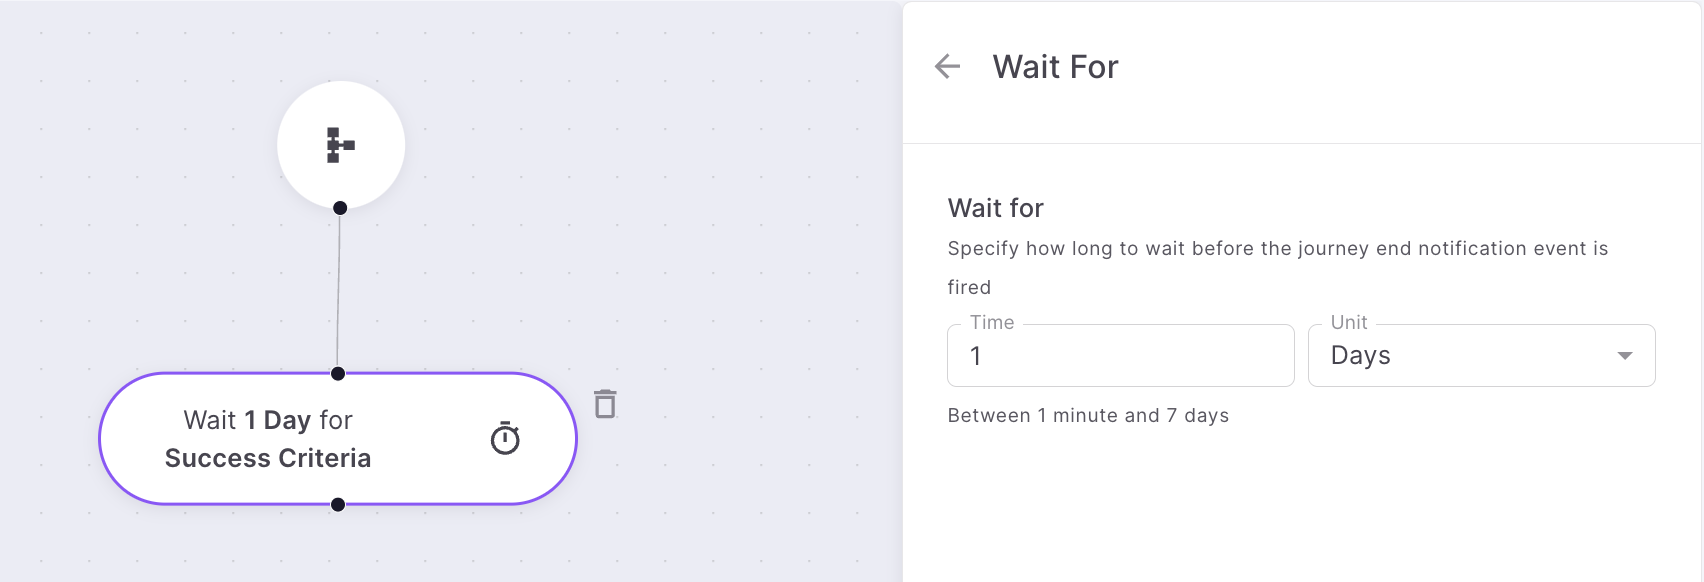
Drag & drop, 'Wait for' under Action and configure wait for as shown below. Now you are giving 1 day time to users to make the SIP payment. If the user makes the payment within 1 day, then 'sip+payment_success' event will fire and users will exit the journey successfully.
-
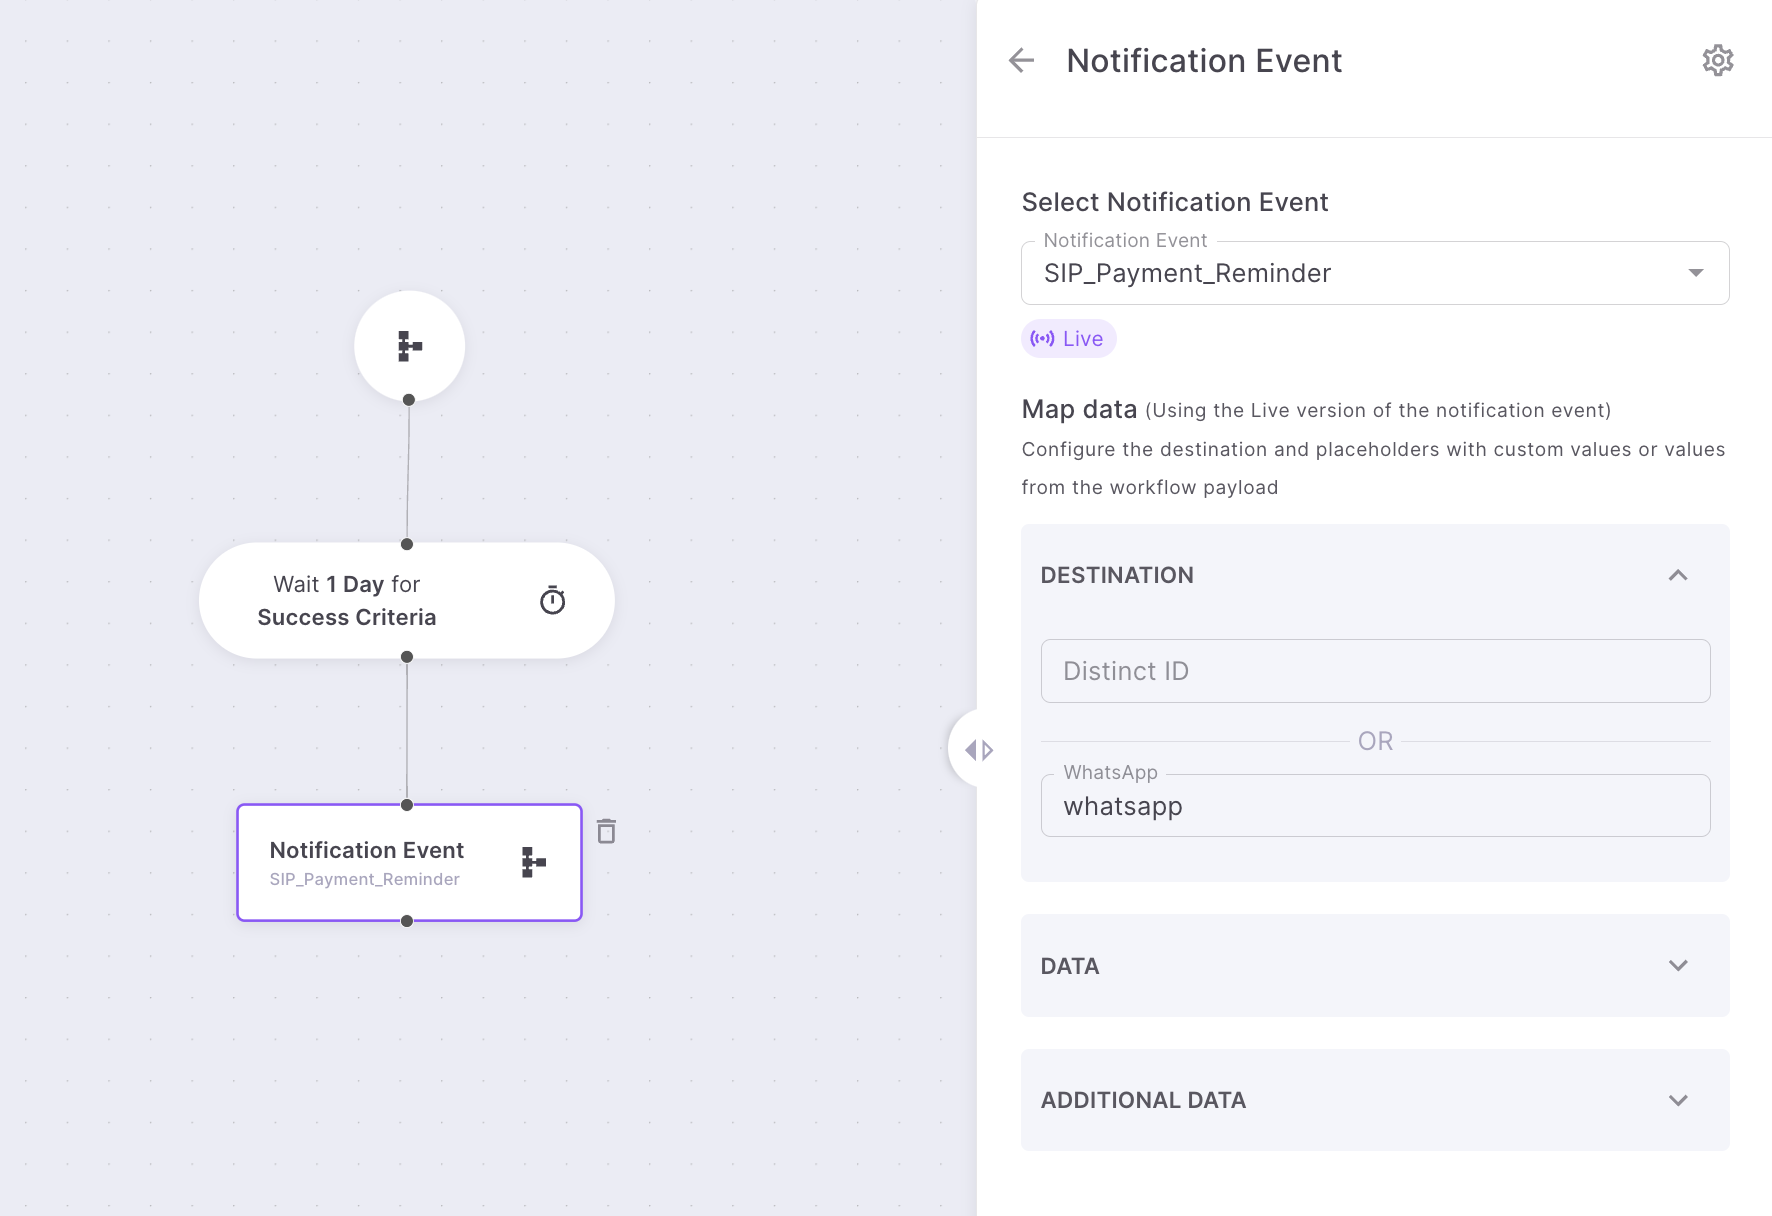
Drag & drop notification event below 'Wait for' as shown below.
-
Select Notification event you want to fire. In this case, it would be sending SIP Payment reminder.
-
Destination - Select DistinctId (if you manage User Profile) in Fyno or destination(s) from the event payload. In this case, we are sending payment reminder in WhatsApp.
-
Data - This will have the list of placeholders configured in the template linked to the notification event selected.
-
Additional Data - if you want to add any other variables which is not added as part of the template, you can add it here.
-
-
Follow Steps 6 & 7 depending on the no of reminders you are planning to send. In this use case, we want to send 3 reminders. So you need to add it as shown below.
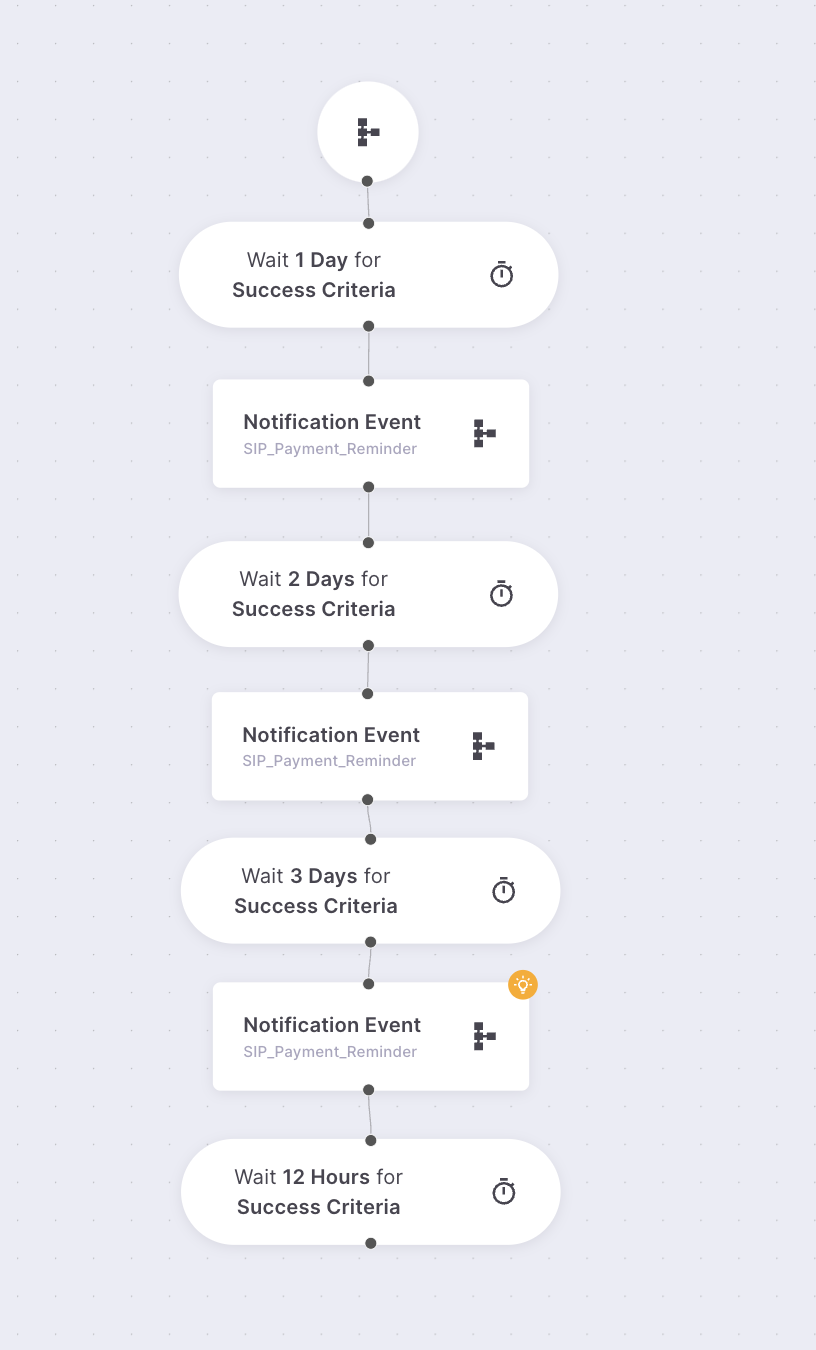
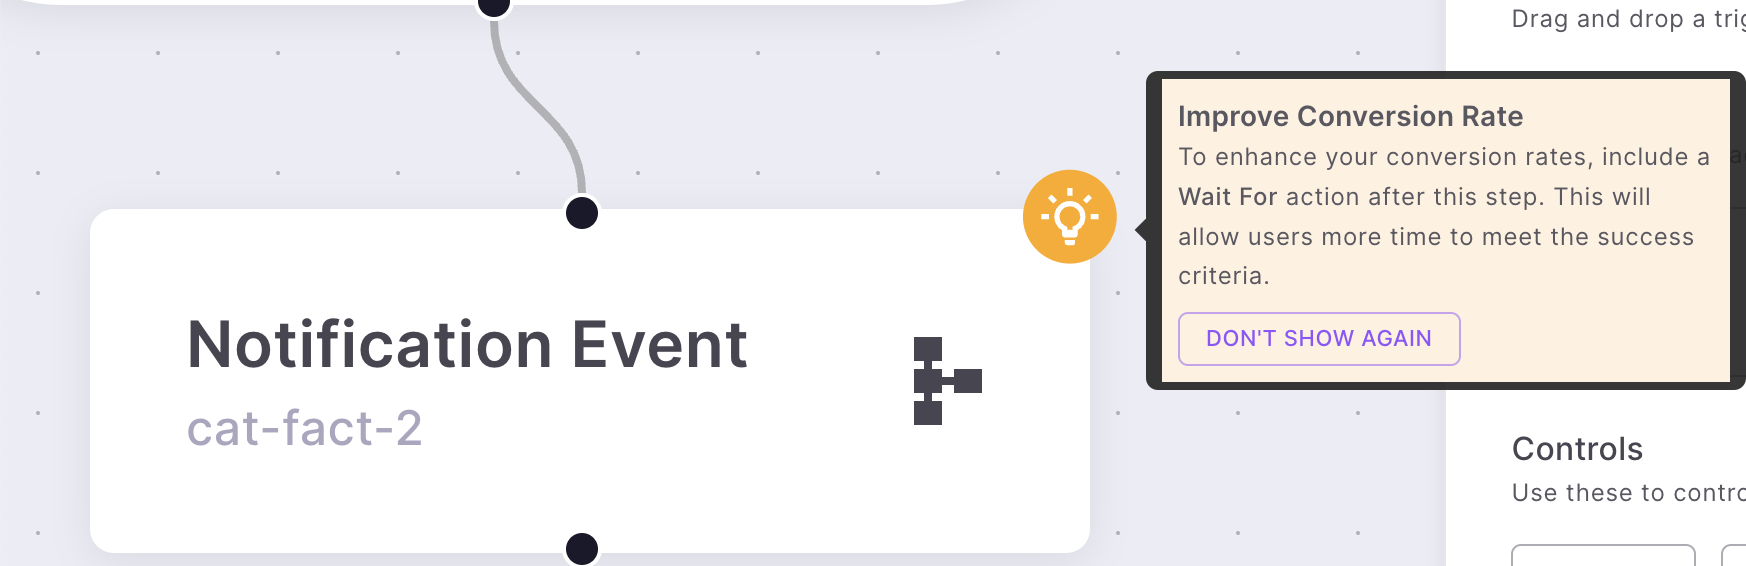
Its recommended to add 'Wait for' after configuring the last Notification Event. This will improve your overall success rate of your journey. You will see the below tip, if you don't add a 'Wait for' after the last notification event.
- User will exit the journey in 2 cases
- When user does the success criteria defined. In this case, once the user makes the SIP payment, they will successfully exit the journey.
- When user received all the notification configured in the journey and reached the end of the journey. In this case, if user doesn't make SIP payment, after 6 days and 12 hours, they will exit the journey.
- When user interacted with the notification sent like Read, Opened, Clicked etc on any of the sent channels. For example, if the target of your notification is user opening the notification, you can set your success metric as Notification Status - Seen/Read.
Your Success Criteria can include multiple conditions. For instance, you might set up the journey to end if either Notification Event A or Notification Event B is triggered.
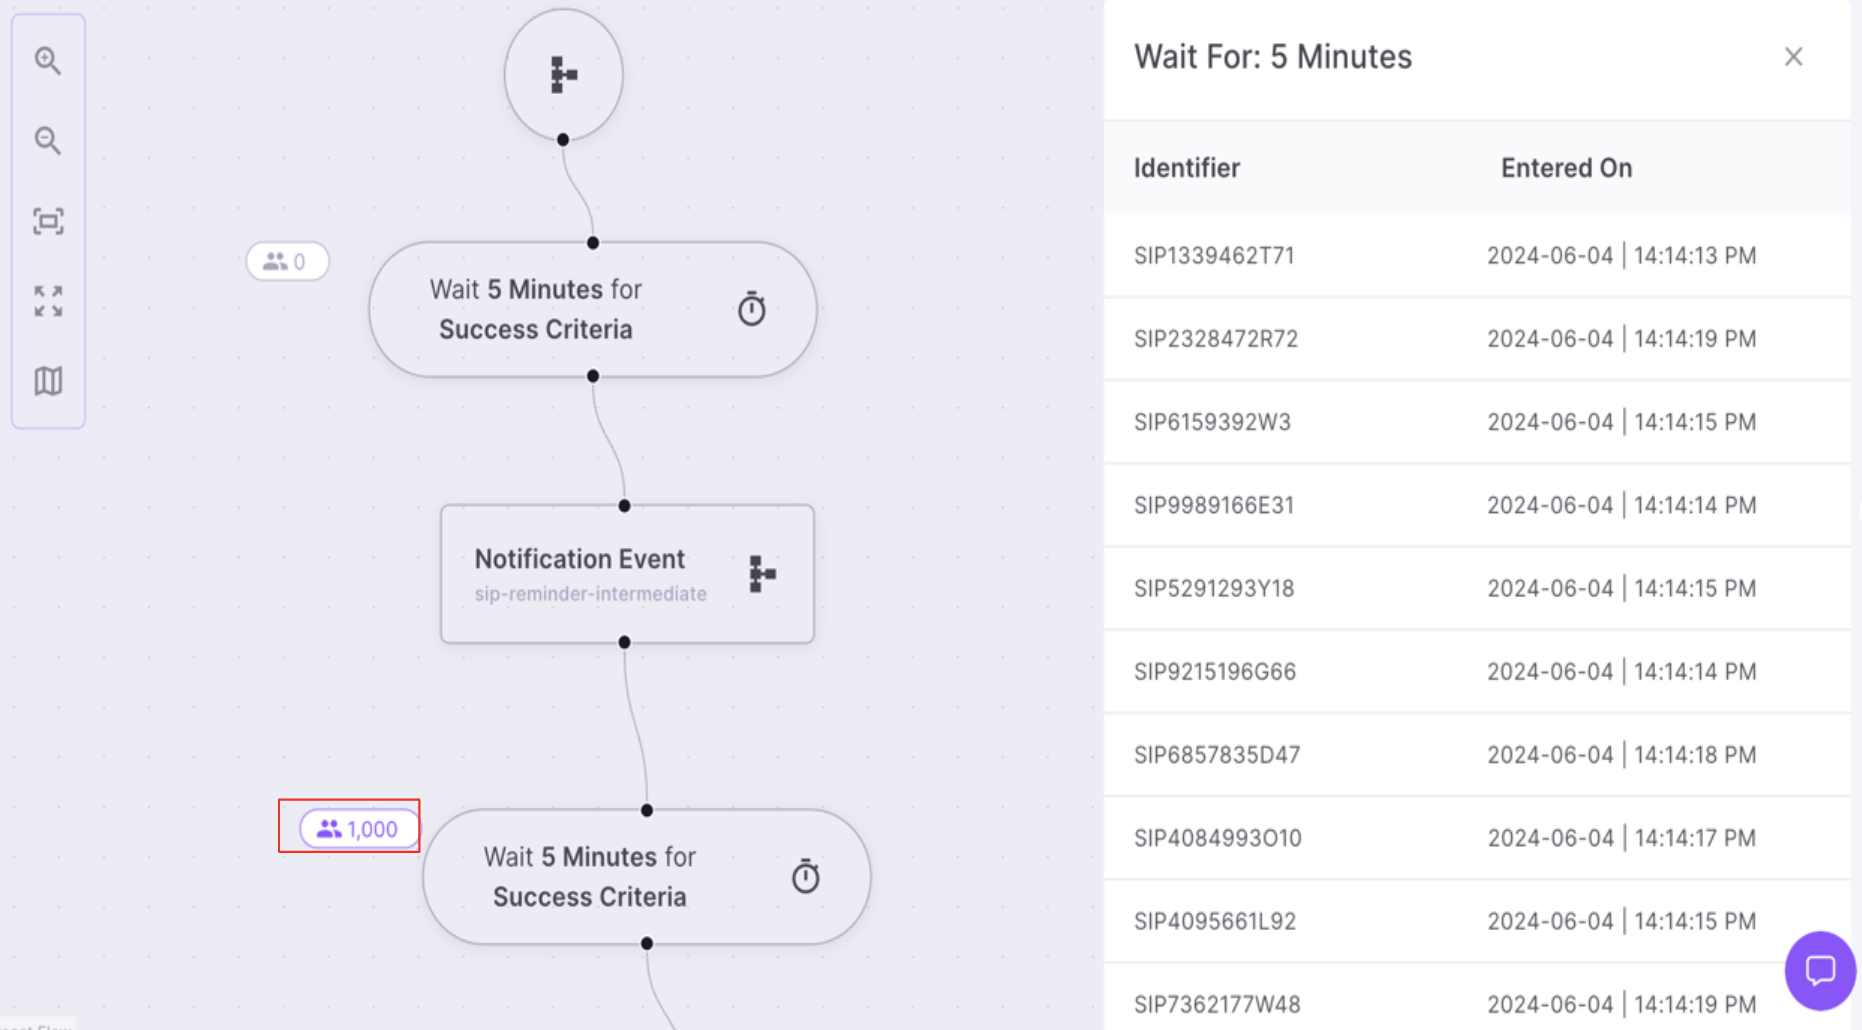
How to view users in the Journey
To view users in the journey, pls enable View Users as shown below.

Once you enable 'View Users' , then you can see no of users at each step (Wait for) of the Journey.
When you click the user count as shown below, it will open up the list of users in the Journey.
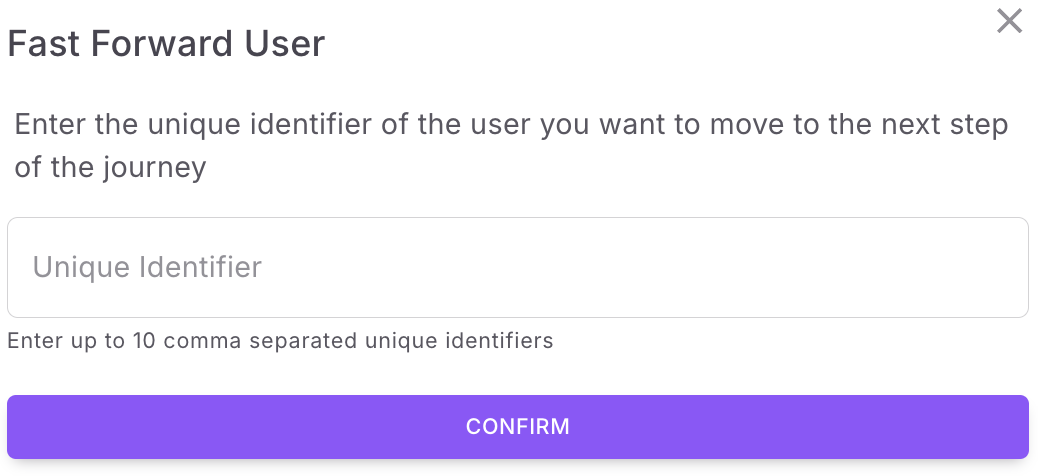
How to fast forward users in the Journey
The 'Fast Forward' feature helps you to move the users to the next step in the journey, especially useful for testing workflows with wait times.
For instance, if your journey includes a 1-day wait period between notifications, you can use Fast Forward to skip this wait time instead of waiting 24 hours to test the next step.
-
Click 'Fast Forward Users' in the top right corner. You will see a popup as shown
-
Enter the Unique Identifiers for the users you want to fast forward (up to 10 at a time). For example, if you configured 'Mobile Number' as your Unique Identifier while creating the journey, enter the mobile numbers here. Click 'Confirm' to proceed."
-
All these users will be automatically moved to the next step in the journey.
What will happen if you edit a journey while its active
For instance, let's consider a scenario where you add an extra step to an active journey. In this case:
- Users who enter the journey after the changes has been made will experience the updated version of the journey, which includes the newly added step.
- Users who are already progressing through the journey at the time of the change will continue with the previous version of the journey, without encountering the additional step.
How to receive delivery reports
Fyno allows you to forward delivery reports to your own system or integrate them with third-party analytics tools like Mixpanel and Amplitude. This feature enables you to track and analyze the success of your notification deliveries seamlessly.
You can read more about it here
How to configure Idempotent Key
Workflows now supports idempotency, ensuring you can safely retry requests without the risk of performing the same operation twice. This feature proves invaluable in scenarios where an API call gets interrupted in transit, leaving you without a response.
You can read more about it here
How to configure overrides
Fyno allows you to override pre-configured values within an Integration, enabling you to use different values for specific notifications in a Workflow. This flexibility is useful when you need to customize the sender information or other details based on the requirements of each notification.
You can read more about it here
Updated 2 months ago