Creating a Notification Event
A notification event is the single most important part of Fyno's application design.
This stitches all the pieces that have been created by you and put them into a configuration flow or "Notification Event" that becomes executable in a single API
For a notification event to be successfully created, you will need to have preconfigured:
- Providers
- Routing (optional)
- Templates
The basic concept of a notification event is:
Providers + Routing (optional) + Templates = Notification Event
Let's have a quick look around the landing page of Notification Events.
You will find an easy toggle to change your view between a card grid and a list view, for your convenience.
Your option to filter out only the Live routes is at the top of the page.
On this page, you can quickly search for any of the notification events by the name given to them at the time of creation.
Create "Notification Events" with significant titles or names to help search for them easily.
A detailed description can also be added at the time of creation.
To create a new Notification Event, click on the "Create+" on the right side of the page.
- Provide a name for your notification event
- Provide a description of your notification event. This helps in the future when you want to review and change things up in your "Notification Event"
- Select Subscription topic from the list of subscriptions created in User Preferences. This is an optional field. Please refer this documentation on how to create subscription
- Click on "Submit" once done.
Make sure to choose the correct Subscription Topic. If a channel is disabled within the Subscription Topic, notifications will not be sent even if the corresponding channel template is configured.
The most anticipated logic that Fyno has cracked is in the next few steps, leading to making your life easy breezy.

On creating a notification event, on each Notification Event card you will see:
- Notification Event Analytics button on the top right corner of the card
- cURL or Code Button, which will open up the Notification Event Trigger Window
- The last updated day or time of the notification event
- The latest version of the Notification Event, including live or test version details.
- "More" menu at the bottom right corner, that gives you the option to
- "Rename" the Notification Event
- "Duplicate" the Notification Event
- "Delete" the Notification Event
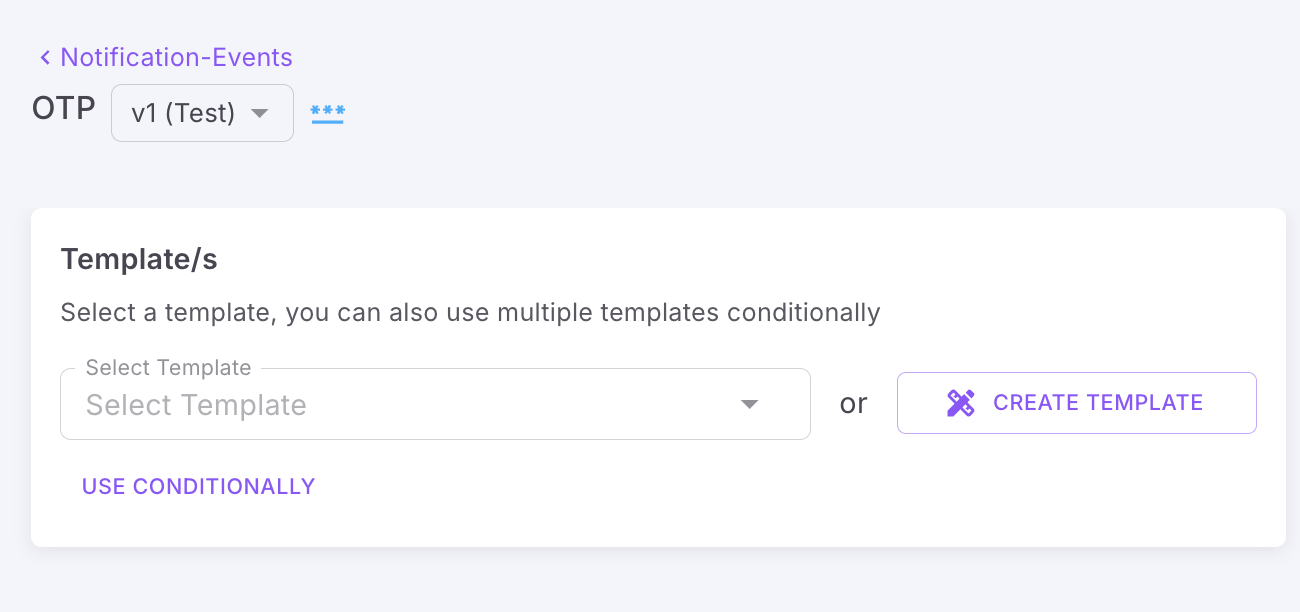
1. Template
The first step to building a great "Notification Event" with Fyno is to select a template that you have already created in the "Templates" section OR to create a new template by clicking 'Create Template'.
-
Selecting a template
-
On clicking on the drop-down, you will see the entire list of templates created. Select one to proceed.
-
On selecting a template, at the bottom of the template selected, you will even be able to see the preview of the template on the right hand side.
-
If you wish to edit the selected template click on the 'EDIT TEMPLATE' button right above the template preview on the right hand side.

-
-
Creating a new template
-
You can create a new template from scratch by clicking 'Create Template'.

-
It will open a popup from where you can start creating a template
-
Refer this doc on how a new template can be created from scratch.
-
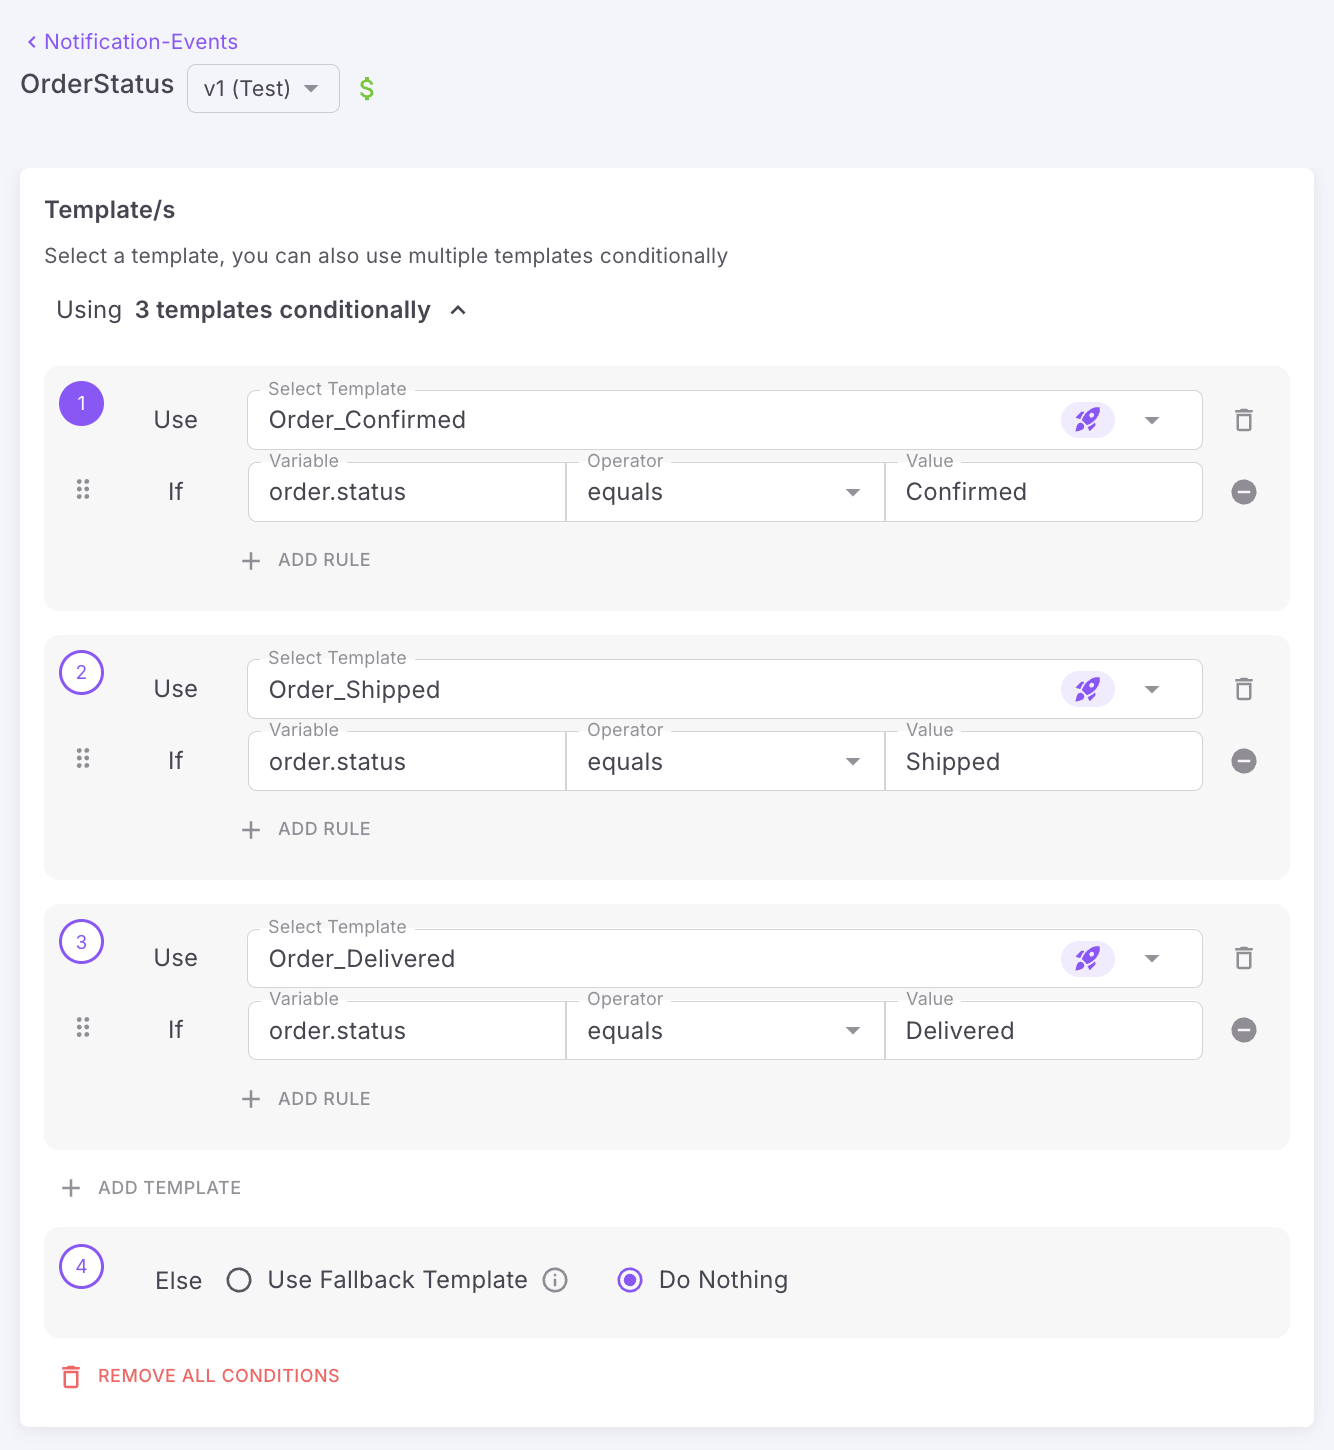
Conditional Templates
Conditional Templates empower you to choose templates based on specific conditions. This feature allows you to associate multiple templates with the same event, eliminating the need for redundant creation of multiple notification events.
How it works?
For instance, if you plan to send order status communications to users for statuses like Order Confirmed, Shipped, In-Transit, and Delivered. You can create four templates, each tailored to a specific order status. With Conditional Templates, you can efficiently manage these 4 templates under a single notification event, streamlining your communication workflow.
There is NO cap on the number of templates you can include in a conditional template flow.
Sample cURL Request:
curl -X POST 'https://api.dev.fyno.io/v1/{Workspace_ID}/event' \
-H 'Authorization: Bearer <YOUR_FYNO_API_KEY>' \
-H 'Content-Type: application/json' \
-d '{
    "event": "Order_Status",
    "to": {
        "email": "<receivers_email>"
    },
    "data": {
        "order": {
            "mobile": "+91 9876543210",
            "order_amount": "₹ 1,350.00",
            "status": "Confirmed",
            "payment_type": "COD",
            "product_name": "abc",
            "customer_name": "Vivek",
            "delivery_date": "25-Dec-2023",
            "order_id": "DEC165432"
        }
    }
}'
curl -X POST 'https://api.dev.fyno.io/v1/{Workspace_ID}/event' \
-H 'Authorization: Bearer <YOUR_FYNO_API_KEY>' \
-H 'Content-Type: application/json' \
-d '{
    "event": "Order_Status",
    "to": {
        "email": "<receivers_email>"
    },
    "data": {
        "order": {
            "mobile": "+91 9876543210",
            "order_amount": "₹ 1,350.00",
            "status": "Shipped",
            "payment_type": "COD",
            "product_name": "abc",
            "customer_name": "Vivek",
            "delivery_date": "25-Dec-2023",
            "order_id": "DEC165432"
        }
    }
}'
curl -X POST 'https://api.dev.fyno.io/v1/{Workspace_ID}/event' \
-H 'Authorization: Bearer <YOUR_FYNO_API_KEY>' \
-H 'Content-Type: application/json' \
-d '{
    "event": "Order_Status",
    "to": {
        "email": "<receivers_email>"
    },
    "data": {
        "order": {
            "mobile": "+91 9876543210",
            "order_amount": "₹ 1,350.00",
            "status": "InTransit",
            "payment_type": "COD",
            "product_name": "abc",
            "customer_name": "Vivek",
            "delivery_date": "25-Dec-2023",
            "order_id": "DEC165432"
        }
    }
}'
curl -X POST 'https://api.dev.fyno.io/v1/{Workspace_ID}/event' \
-H 'Authorization: Bearer <YOUR_FYNO_API_KEY>' \
-H 'Content-Type: application/json' \
-d '{
    "event": "Order_Status",
    "to": {
        "email": "<receivers_email>"
    },
    "data": {
        "order": {
            "mobile": "+91 9876543210",
            "order_amount": "₹ 1,350.00",
            "status": "Delivered",
            "payment_type": "COD",
            "product_name": "abc",
            "customer_name": "Vivek",
            "delivery_date": "25-Dec-2023",
            "order_id": "DEC165432"
        }
    }
}'
- Navigate to the notification event page and click on "Use conditionally" under Templates section.
- To add conditions, follow these steps:
- Select the template you wish to use.
- Establish conditions based on variables.
For instance, to trigger the Order Confirmed communication, select the 'Order_Confirmed' template and set the condition as "status equals Confirmed," and repeat this process for other statuses accordingly. You can use 'Add rule' to add multiple conditions to choose a template. - You can click 'Add Template' to keep adding new templates with conditions.
- Ensure, 'Else' condition is added. You can choose either 'Do Nothing' or select a fallback template attached if none of the other conditions are not satisfied.
- To delete any of the conditions added, click the delete icon on the right hand side of each condition added.
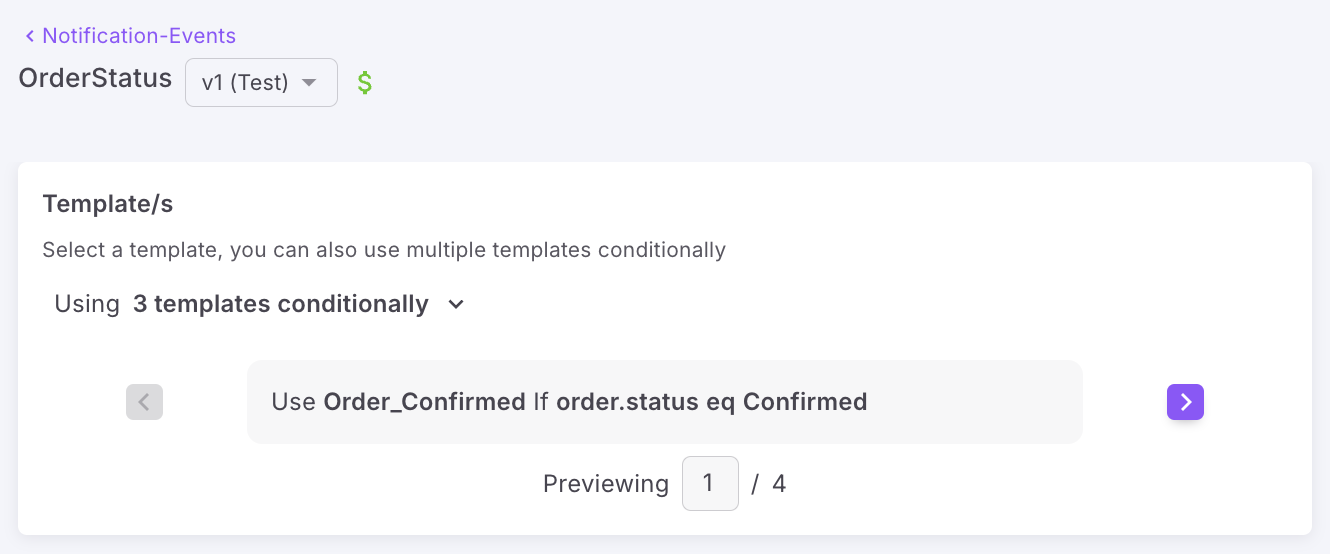
- To preview a template, click the numbered button in the top-left corner of the conditional template card. The preview will appear on the right side of the page.
- To rearrange the conditions, you can drag them up or down by clicking the 'Drag Indicator' icon on the left-hand side of each condition.
- You can remove all the conditions by clicking 'Remove all conditions' icon at the bottom.
- Once you have added all the conditions, you will see the conditions in collapsed format as shown below. You can see the preview of different templates by clicking '>' icon to navigate forward and by clicking '<' to navigate backwards or type in the condition number in the field next to 'Previewing' to go directly to that template.
- To modify any of the conditions, simply click on 'Edit Conditions.'
On to the next step!
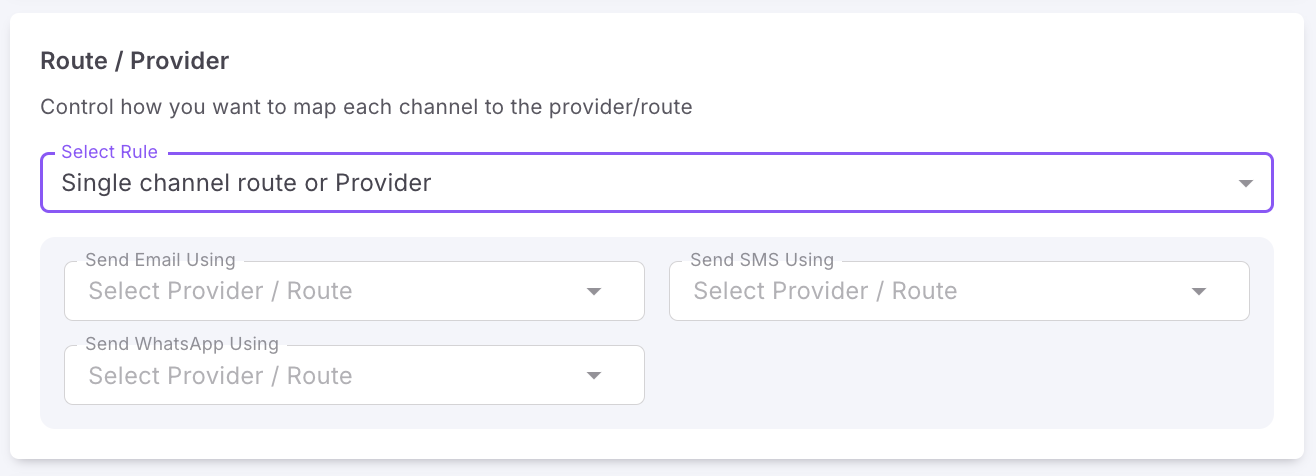
2. Route/Provider
Route/Provider allows you to define the manner in which the notification will be sent across channels and providers.
On clicking the drop-down menu under Rules, you will see:
-
Single Channel Route or Provider - Individually select each channel and select a Provider or Route for each channel. For example, if your template has 3 channels, you will see options to select how you want to send your Email, SMS and WhatsApp. You can decide to choose a service provider or a Single channel route created for that channel. You can read more about Single Channel Route here
-
Omni-channel Route - Select an Omni-Channel Route that has been created. You can read more about Omni Channel Route here
3. Analytics Label (Optional)
Select this option if you want to either group analytics of multiple notification events or filter analytics of a single notification event.
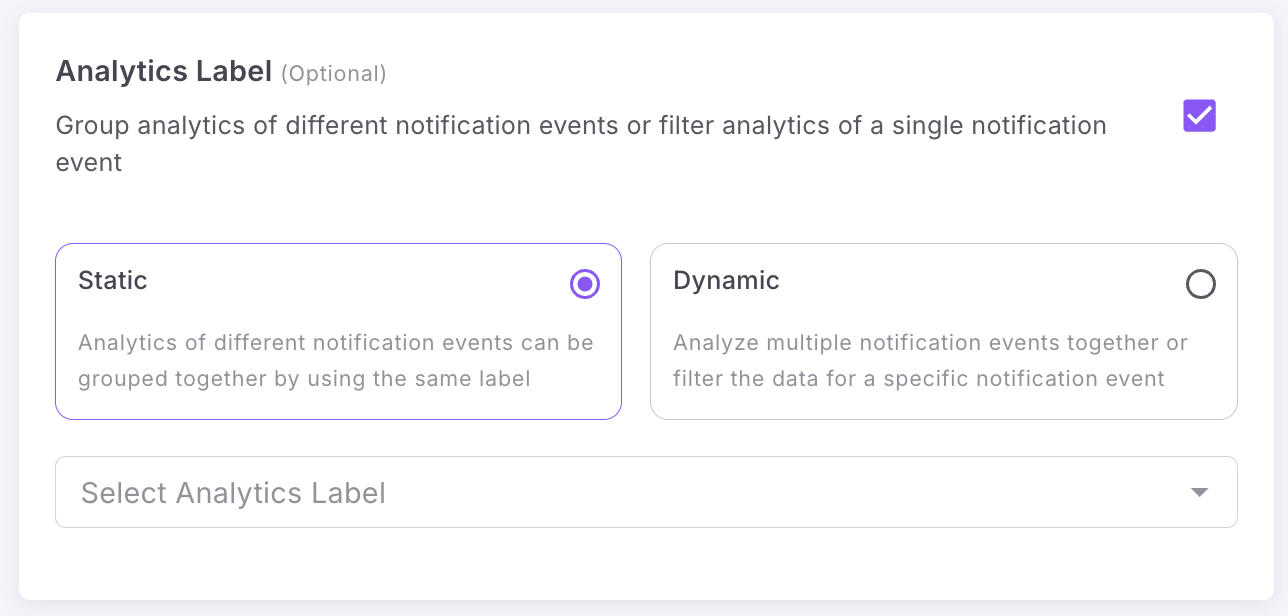
You can select either Static or Dynamic analytics labels.
-
Static - Use this option to consolidate and analyze analytics across multiple related notification events.
- Example: - For instance, if you want to track multiple status notifications (Confirmed, Shipped, InTransit, Delivered) in one comprehensive view. This eliminate the need to analyze each notification separately. Helps you to gain holistic insights into customer engagement across the entire order journey
By grouping these notifications, you'll understand the complete performance of your Order Status communication at a glance. - How to Group Analytics:
- Navigate to the analytics label dropdown
- Select the specific Order Status notifications you want to analyze together
- Related Resources:
- Example: - For instance, if you want to track multiple status notifications (Confirmed, Shipped, InTransit, Delivered) in one comprehensive view. This eliminate the need to analyze each notification separately. Helps you to gain holistic insights into customer engagement across the entire order journey
-
Dynamic - This feature allows you to dive deep into your notification performance by either:
- Grouping analytics across multiple notification events
- Filtering data for a specific notification event
- Example:Imagine you're sending policy renewal emails using a single template across different mobile brands (Apple, Samsung, Vivo, and Oppo).
- How to Analyze by Device Brand:
- Use the placeholder {{brand_name}} as your Analytics label
- This enables you to track performance metrics for each mobile brand separately
- How to Analyze by Device Brand:
- Related Resources:
- To know how to add analytics labels, please refer this document
- To see how to view the analytics, you can refer this document.
4. Check for Duplication (Optional)
This option will be visible only if you enable 'Duplicate Message Check' settings. You can read how to enable this setting here
Enabling this option will drop notifications with the same template ID, channel and destination. Additionally you can check placeholder(s) too before deciding whether to drop a notification or not. This will make sure users don't get duplicate content if its triggered by mistake from your end.
- Enable Check for Duplication checkbox.
- Enter the duration till which you want to check for duplication. For example, if you fired the notification and want to check for duplicate content and drop it for the next 1 hour, enter 1 hour. You can enter upto 24 hours.
- Enable 'Exceptions' option, to check the placeholder data before deciding whether to drop a notification or not. You can select the placeholders to check (along with template ID, channel and destination) from the dropdown.
- Example Scenario
Imagine sending SIP confirmation notifications where:- A user has multiple SIPs
- Each SIP is for a different stock
- All SIPs have the same amount
- The only differentiating factor is the stock name
- How to Use:
- Enable Exceptions feature
- Select relevant placeholders from the dropdown (e.g., 'Stock')
- Fyno will then consider the stock name when checking for duplicates
- Result: All notifications will be sent, even with same template/channel/destination
5. Track Conversion (Optional)
This option will be visible only if you enable Conversion Tracking setting. You can read how to enable this setting here
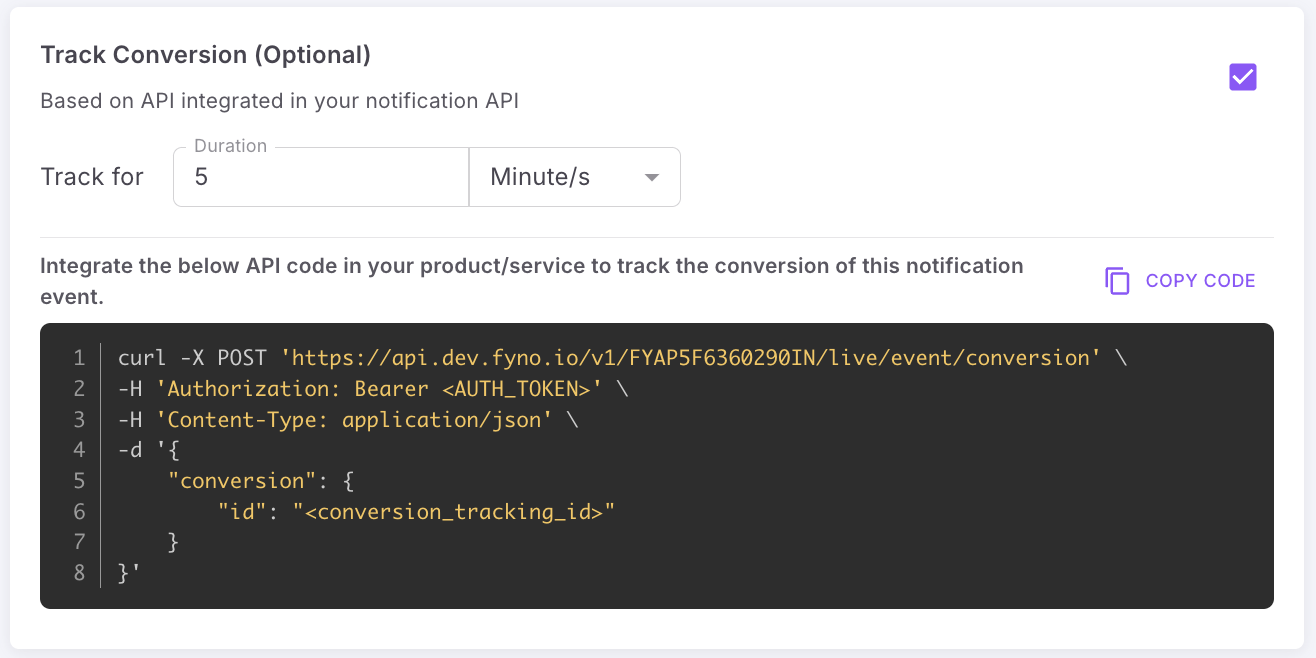
- Enable Track conversion checkbox.
- Enter the duration till which you want to track the conversion. For example, if you fired the notification and want to track conversion for the next 5 minutes, enter 5 minutes.
- Click Copy Code. You need to pass only conversion id in the data payload to intimate Fyno to mark the notification as 'Converted' for a user/destination. Make sure, you pass the same conversion id while triggering the notification event also.
5. Save & Go Live
Make sure you save every change by hitting the "Save" button at the top of the page. This will only save your changes as Test
On clicking on the Go Live CTA, the notification event will be live immediately.
Test and Live Versions
When a Test version is saved, this does not disturb the Live version that may be plugged in your application and may be active.
When you are confident and happy with the Notification Event that you have created and tested in Test version, this can then be moved into live version by following the below steps.
- Make the final changes on the notification event and test it to make sure you are getting the desirable results.
- On the top of the page, next to the name of the Notification Event, you will see the Test Version mentioned.
- To keep this as a Test, click on Save and the draft will be saved.
- To make this version of the Test live, click Go Live.
- This will make the current version the live version of the Notification Event.
How to group Notification events
Notification Events Groups help you organize related notification events together. For instance, if you have multiple notification events for different order statuses (Confirmed, Cancelled, Shipped, InTransit, Delivered), you can create an 'Order Management' group and assign all these notification events to it. This makes notification events filtering and management more efficient.
You can read more about it here
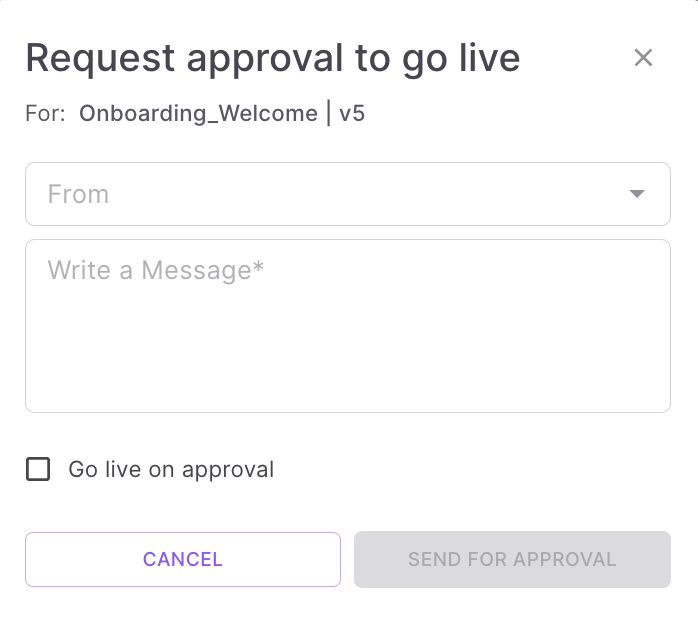
Approval flow
If you have enabled 'Approval' in Security Settings, when you click 'Go Live', you will need to raise an approval request for the changes you have done.
-
You will see the below popup once you click 'Go Live' . Select approvers from the 'From' dropdown. You can choose one or more approvers. You need to write a short message mentioning the reason for approval request. If you select 'Go Live on approval', the feature will go Live once the approver approves the request. Clicking 'Send for Approval' will send the request.
-
You will see the approval request in the Notification event page as shown . You can click 'Cancel' to cancel the request.

-
The approvers will receive an Email, an InApp notification for every approval request.
-
The approver will see the request in the Notification event page. The approver can approve or reject from the respective notification event.

-
Also if the approver wants to see all the pending requests, then can see them in the 'Requests' page as shown below.
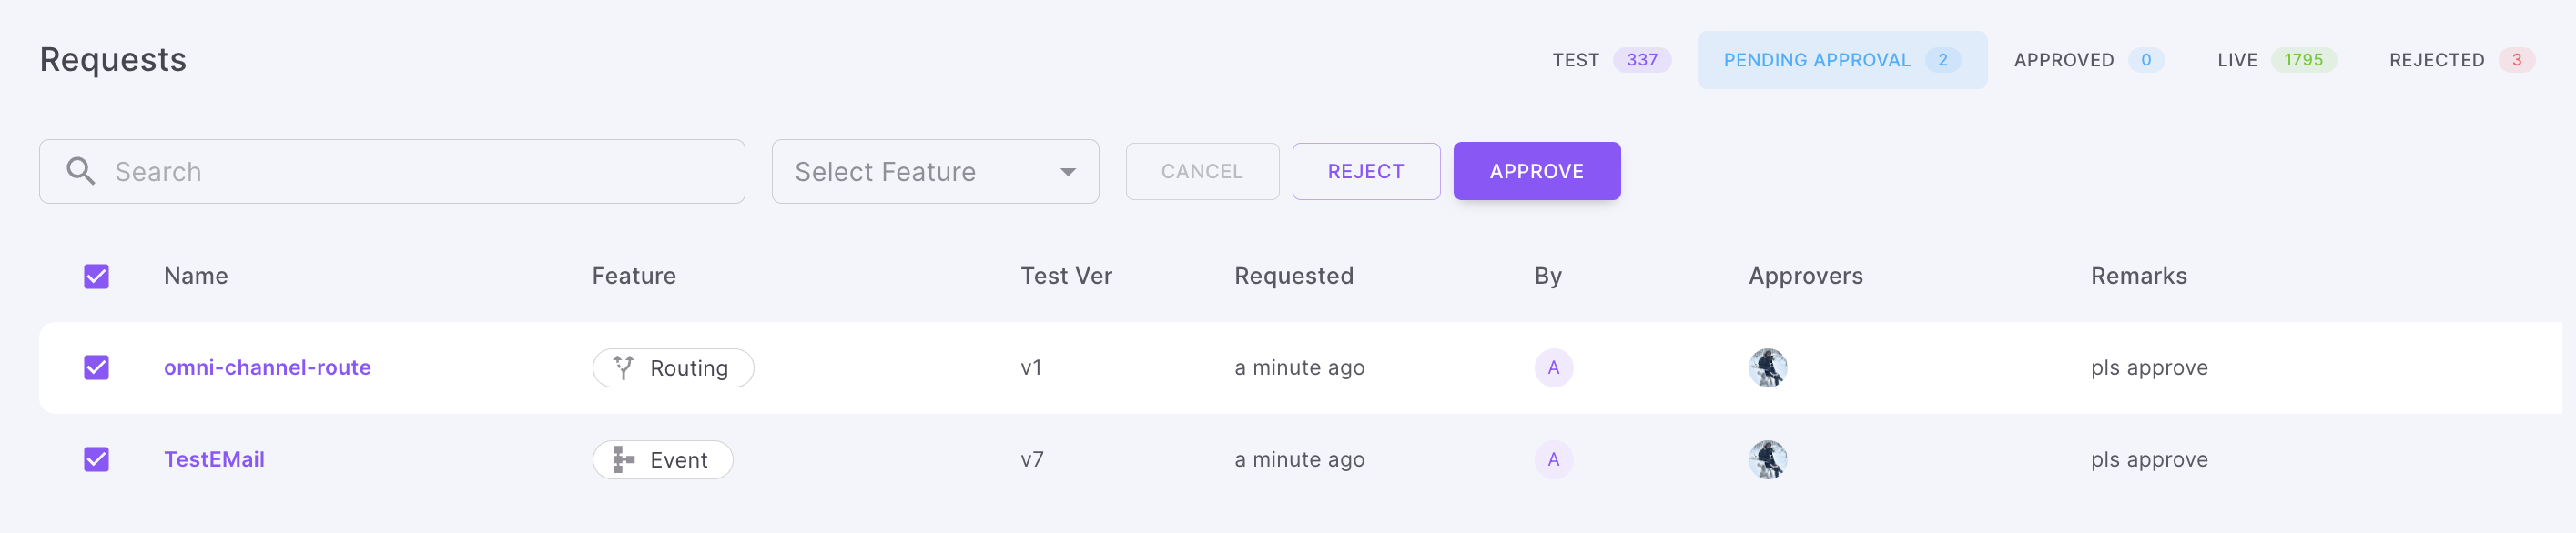
- The approver can choose one or more requests and either Approve or Reject. While rejecting they need to provide a rejection reason.
- If the request is Approved, the feature will go Live if the requestor selected 'Go Live on approval' while raising the request. Otherwise, they have to click 'Go Live' to take the feature Live.
Updated 7 days ago
Understand how to trigger a notification through Playground and copy API code